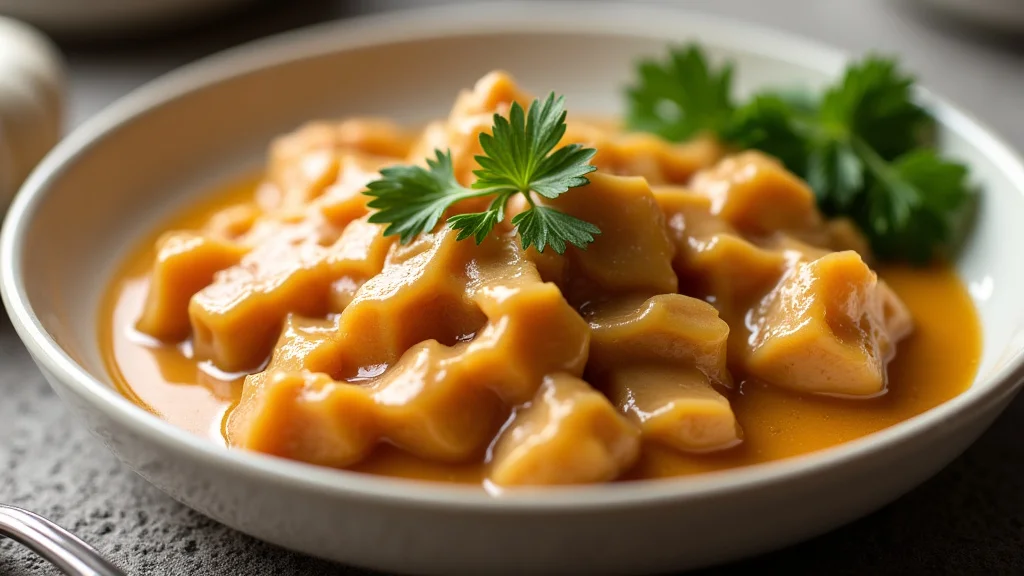
Easy Garlic Chicken Gravy Cooking Recipe
Making a delicious garlic chicken gravy can seem tricky for new cooks. You might worry about getting the texture just right or making sure the flavors blend perfectly. But it doesn’t have to be hard!
This guide will show you the simple steps for a fantastic garlic chicken gravy. Get ready to make a dish everyone will love.
Key Takeaways
- You will learn the basic ingredients for a tasty gravy.
- Discover simple techniques for the perfect gravy consistency.
- Understand how to enhance the garlic flavor without it being too strong.
- Find tips for serving your gravy with chicken and other dishes.
- Get advice on storing and reheating your homemade gravy.
The Heart Of Great Gravy
Creating a wonderful garlic chicken gravy recipe involves a few key elements working together. It’s about building layers of flavor from simple ingredients. Many people find gravy a bit challenging because getting the right thickness and flavor balance can take practice.
Sometimes, gravies can be lumpy or too thin, or the garlic flavor might overpower everything else. This section breaks down what you need to get started for a perfect result every time.
Essential Ingredients For Garlic Chicken Gravy
The foundation of any great gravy, especially a garlic chicken gravy, lies in its components. You need fresh, quality ingredients to ensure the best taste. Think of these as the building blocks for a rich, savory sauce that elevates your chicken.
- Chicken Drippings
This is where the magic starts. When you cook chicken, especially chicken thighs or a whole chicken, the fat and juices that collect in the pan are packed with flavor. These drippings are the soul of your gravy.
They provide a savory base that is hard to replicate with just stock. You want about 2-4 tablespoons of these precious drippings. If you’re making gravy without pan drippings from chicken, you can use butter or a neutral oil, but it won’t have the same depth.
- All-Purpose Flour
Flour is the thickener. It combines with the fat to create a roux, which is the base for many sauces. For our garlic chicken gravy, we typically use all-purpose flour.
The amount needed depends on how thick you want your gravy. A good starting point is usually one tablespoon of flour for every tablespoon of fat. This ratio helps create a smooth, lump-free gravy.
The flour needs to be cooked for a short while to remove the raw flour taste.
- Garlic
Fresh garlic is what makes this gravy special. You can mince it, finely chop it, or even grate it. The amount of garlic you use is a matter of preference, but for a prominent garlic flavor, aim for 2-4 cloves per cup of liquid.
Cooking the garlic gently in the fat before adding the flour helps to mellow its sharpest edges and release its sweet, aromatic qualities. Be careful not to burn the garlic, as this can make it bitter.
- Chicken Broth Or Stock
This is the liquid that brings everything together and forms the body of the gravy. Low-sodium chicken broth is a good choice because it allows you to control the saltiness of your final dish. You can also use homemade chicken stock for an even richer flavor.
The amount of broth will determine the volume of your gravy. For a standard batch, around 2 cups of broth is a good starting point. Warmer broth incorporates more easily into the roux, preventing lumps.
- Seasonings
Salt and black pepper are essential. You might also consider adding a pinch of dried thyme, rosemary, or a dash of soy sauce or Worcestershire sauce for extra umami. Always taste and adjust seasonings at the end.
Start with a small amount of salt, as chicken drippings and broth can already be salty.
Choosing The Right Fat For Your Roux
The fat you use in your roux is crucial for flavor and texture. It interacts with the flour to create that essential thickening agent. Different fats offer different flavor profiles, so picking the right one can enhance your garlic chicken gravy.
- Rendered Chicken Fat
This is the gold standard when making chicken gravy. It comes directly from the chicken you cooked and carries its savory essence. If you roast a whole chicken or cook chicken thighs, you’ll get a good amount of flavorful fat in the bottom of the pan.
This fat already has a chicken flavor, which is perfect for building a deeply savory gravy. Using rendered chicken fat means your gravy will have an authentic taste that’s hard to achieve with other fats.
- Butter
Unsalted butter is another excellent option. It adds a rich, creamy flavor to the gravy. When butter melts and cooks, it creates a delicious nutty aroma and a smooth texture.
It’s also very forgiving to work with for making a roux. If you don’t have chicken drippings, butter is a fantastic substitute. Aim for about one tablespoon of butter for every tablespoon of flour.
- Neutral Oils
Oils like canola, vegetable, or grapeseed oil can also be used. They are good if you want a neutral fat that won’t impart its own strong flavor. While they work well for thickening, they don’t add the same richness or savory notes as rendered chicken fat or butter.
They are a practical choice if those options are unavailable.
Crafting The Perfect Garlic Chicken Gravy
Now that you know the ingredients, let’s get to the actual cooking. Making a smooth, flavorful gravy is a straightforward process when you follow these steps. It’s all about building flavor and achieving the right consistency.
This is where your garlic chicken gravy cooking recipe truly comes to life.
Step-By-Step Cooking Process
Follow these simple steps to create your delicious garlic chicken gravy. Each stage builds on the last to ensure a rich and satisfying result.
-
Prepare Your Base
If you have pan drippings from cooked chicken, pour off excess fat, leaving about 2-3 tablespoons in the pan. If you don’t have drippings, melt 2 tablespoons of unsalted butter in the pan over medium heat. Once the fat is warm, add your minced or chopped garlic.
Cook for about 1 minute until fragrant. Be very careful not to burn the garlic, as burnt garlic tastes bitter.
-
Make The Roux
Sprinkle 2 tablespoons of all-purpose flour over the garlic and fat in the pan. Stir continuously with a whisk or wooden spoon. Cook the flour and fat mixture for about 1-2 minutes.
This process, called making a roux, cooks out the raw flour taste and helps thicken the gravy. You want the roux to be a light golden color. Don’t let it get too dark, or it will affect the gravy’s final color and flavor.
-
Add The Liquid Slowly
Gradually whisk in 1.5 to 2 cups of warm chicken broth or stock. Add a little bit of broth at a time, whisking constantly. This helps to prevent lumps from forming.
Once you’ve added about half of the broth and it has thickened into a smooth paste, you can add the remaining broth more quickly while continuing to whisk. Keep whisking until the gravy is smooth and there are no lumps.
-
Simmer And Thicken
Bring the gravy to a gentle simmer over medium-low heat. Continue to cook and stir occasionally for about 5-10 minutes, or until the gravy has thickened to your desired consistency. If it’s too thick, you can add a little more broth or water.
If it’s too thin, you can let it simmer longer uncovered, or whisk in a little more flour mixed with a tablespoon of cold water (a slurry).
-
Season To Perfection
Taste the gravy and season with salt and freshly ground black pepper as needed. Remember that chicken drippings and broth can already be salty, so start with a small amount of salt and add more if necessary. You can also add other seasonings like a pinch of dried thyme or a dash of Worcestershire sauce for extra depth.
Tips For Achieving The Perfect Gravy Consistency
Getting the right texture is key for a great gravy. It should be smooth and coat the back of a spoon without being too thin or too thick.
- Whisk Constantly
The most important tool for a smooth gravy is your whisk. When you add the liquid to the roux, whisking continuously prevents lumps from forming. Tiny lumps can sometimes be whisked out, but it’s best to avoid them altogether by whisking diligently from the moment you start adding the broth.
- Use Warm Liquid
Using warm chicken broth or stock makes it much easier to incorporate into the roux. Cold liquid hitting a hot roux can cause it to seize up and create lumps. Warming your broth slightly in a separate pot or microwave before adding it to the pan will ensure a smoother, more cohesive mixture.
- Patience During Simmering
The thickening process takes a little time. After adding the liquid, let the gravy simmer gently. As it simmers, the flour particles will swell and release their thickening power.
Don’t rush this step; allow it to cook down for at least 5-10 minutes. This also helps to cook off any residual flour taste and meld the flavors.
- Adjust With Slurry Or More Liquid
If your gravy is too thin after simmering, you can make a slurry. Mix 1 tablespoon of flour or cornstarch with 2 tablespoons of cold water until smooth. Whisk this slurry into the simmering gravy and cook for another minute or two until thickened.
If it’s too thick, simply whisk in a bit more warm broth or water until it reaches your desired consistency.
Enhancing The Garlic Flavor
Garlic is the star of this gravy, but it needs to be handled with care to get the best taste.
- Sauté Gently
When you first add the minced garlic to the warm fat, sauté it over medium-low heat. You want to cook it just until it becomes fragrant, about 30-60 seconds. This gentle cooking mellows the sharp, raw flavor of the garlic and releases its natural sweetness.
If you cook it for too long or at too high a heat, it can burn, turning bitter and ruining the gravy.
- Consider Roasted Garlic
For a milder, sweeter, and deeper garlic flavor, try using roasted garlic. You can roast a whole head of garlic by cutting off the top, drizzling it with olive oil, wrapping it in foil, and baking it at around 400°F (200°C) until soft. Squeeze the soft cloves out and mash them before adding them to your fat and flour mixture.
This method adds a wonderful complexity.
- Don’t Overdo It
While we want a noticeable garlic flavor, too much can be overpowering. Start with 2-3 cloves for a standard batch. You can always add more towards the end if you feel it needs it, but you can’t take it away once it’s in.
Taste as you go.
Serving And Storing Your Garlic Chicken Gravy
Once your delicious garlic chicken gravy is ready, you’ll want to know how best to serve it and store any leftovers. Proper handling ensures it stays fresh and tasty.
Ideas For Serving Your Gravy
This garlic chicken gravy is incredibly versatile. It’s not just for chicken!
- With Roasted Chicken
The classic pairing. Pour generous amounts over sliced roasted chicken, chicken breasts, or thighs. It’s the perfect way to add moisture and flavor to even the driest chicken.
- Over Mashed Potatoes
Mashed potatoes and gravy are a match made in heaven. The creamy potatoes soak up the savory, garlicky gravy beautifully.
- With Biscuits Or Bread
Dip warm, fluffy biscuits or crusty bread into the gravy for a simple yet satisfying snack or side dish.
- With Other Meats
Don’t limit yourself to just chicken! This gravy is also delicious over pork chops, turkey, or even steak.
- In Casseroles
Use it as a base or a binder in chicken pot pies or other savory casseroles for an extra layer of flavor and moisture.
Storing Leftover Gravy
Leftover gravy is a treasure. You can store it for later use to quickly add flavor to meals.
- Refrigeration
Allow the gravy to cool completely before transferring it to an airtight container. Store it in the refrigerator for up to 3-4 days. The fat will solidify on top, which is normal and helps to preserve it.
Just remove the hardened fat layer before reheating, or whisk it back in for extra richness.
- Freezing
For longer storage, gravy freezes well. Once completely cooled, pour it into freezer-safe containers or heavy-duty freezer bags. It can be stored in the freezer for up to 2-3 months.
Leave a little headspace in containers, as liquids expand when frozen.
Reheating Your Homemade Gravy
When you’re ready to enjoy your stored gravy, reheating is simple.
- Stovetop Method
The best way to reheat gravy is on the stovetop. Place the gravy in a saucepan over medium-low heat. Stir frequently until heated through.
If the gravy has thickened too much in the fridge, whisk in a little water or broth to reach your desired consistency. Add a small pat of butter for extra shine and richness if you like.
- Microwave Method
For a quick reheat, place the gravy in a microwave-safe bowl. Heat on medium power, stirring every 30-60 seconds, until hot. Stirring is crucial to ensure even heating and prevent hot spots.
Be careful not to overheat, as this can cause it to break or scorch.
Common Myths Debunked
Myth 1: You Need Pan Drippings To Make Good Gravy
While pan drippings add wonderful depth of flavor, they are not strictly necessary. You can create a delicious garlic chicken gravy using unsalted butter as your fat base. The key is to still develop a good roux and use quality chicken broth.
You can even add a small amount of chicken bouillon or a pinch of poultry seasoning to the broth to boost the chicken flavor if you don’t have drippings.
Myth 2: All Gravy Lumps Are Unfixable
Lumps in gravy often happen when the liquid isn’t added gradually or whisked well. However, most lumps can be fixed. If you have small lumps, vigorous whisking might smooth them out.
For more stubborn lumps, you can carefully strain the gravy through a fine-mesh sieve. Press the gravy through with a spoon to catch any remaining lumps. This will leave you with a silky smooth consistency.
Myth 3: Garlic Gravy Will Be Too Strong Or Spicy
The intensity of garlic flavor is highly controllable. Cooking the garlic gently in the fat before adding flour mellows its sharpness. Roasting garlic beforehand or using less garlic are also ways to adjust the flavor.
The longer the gravy simmers, the more the flavors meld and the garlic becomes more integrated and less harsh.
Myth 4: Gravy Should Be Very Thick
Gravy consistency is a personal preference. While some like it thick enough to stand a spoon up in, others prefer a lighter, more pourable sauce. The recipe provides a range for the liquid, and you can adjust it to your liking.
Remember that gravy will also thicken slightly as it cools, so aim for a consistency slightly thinner than you want the final product to be.
Frequently Asked Questions
Question: How much garlic should I use for my garlic chicken gravy cooking recipe
Answer: For a noticeable but not overpowering garlic flavor, start with 2-3 cloves of fresh garlic, minced, per cup of broth. You can always add more towards the end of cooking if you desire a stronger taste.
Question: Can I make this gravy without chicken broth
Answer: Yes, you can substitute chicken broth with vegetable broth or even water in a pinch. However, using chicken broth or stock will provide the most authentic and savory chicken flavor.
Question: My gravy is too thin what can I do
Answer: If your gravy is too thin, you can thicken it by letting it simmer uncovered for a bit longer. Alternatively, you can make a slurry by mixing 1 tablespoon of flour or cornstarch with 2 tablespoons of cold water, then whisking it into the simmering gravy until thickened.
Question: How long does homemade gravy last
Answer: Properly stored in an airtight container in the refrigerator, homemade garlic chicken gravy will last for 3 to 4 days. It can also be frozen for up to 2 to 3 months.
Question: Can I use cornstarch instead of flour to thicken the gravy
Answer: Yes, you can use cornstarch. Use about half the amount of cornstarch compared to flour. Mix it with cold water to make a slurry before adding it to the simmering gravy to avoid lumps.
Final Thoughts
You’ve learned how simple it is to make amazing garlic chicken gravy. You know the ingredients and the easy steps. Follow this guide, and you’ll create a delicious gravy every time.
Enjoy serving your perfectly seasoned, smooth, and flavorful creation.
Related Posts

Easy Homemade Chicken Nuggets Cooking Recipe

Easy Crispy French Fries Cooking Recipe