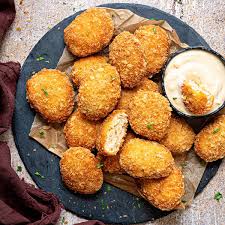
Easy Homemade Chicken Nuggets Cooking Recipe
Making chicken nuggets at home might sound tricky. People worry it takes too long or is hard for beginners. But it’s actually quite simple to get delicious, crispy nuggets!
This guide will show you exactly how to make a fantastic chicken nuggets homemade cooking recipe without any fuss. Get ready for tasty, homemade goodness that everyone will love.
Key Takeaways
- You will learn the basic ingredients needed for simple chicken nuggets.
- Discover easy steps for preparing and breading chicken for nuggets.
- Get tips for cooking nuggets to golden perfection using baking or frying.
- Find out how to make tasty dipping sauces to go with your nuggets.
- Understand why homemade nuggets are healthier and tastier than store-bought.
Simple Chicken Nuggets Homemade Cooking Recipe Basics
Creating your own chicken nuggets is a wonderful way to control what goes into your food. You get to pick fresh ingredients and avoid preservatives often found in store-bought versions. This section covers the essential items you’ll need.
Think of it as your shopping list for deliciousness. Having the right things ready makes the whole process smooth and enjoyable.
Ingredients You’ll Need
To make great chicken nuggets, you don’t need many special items. The star is, of course, chicken breast. Boneless, skinless chicken breast is ideal because it’s easy to cut and cook evenly.
You’ll also need some simple pantry staples for the coating. This includes flour, eggs, and breadcrumbs.
For the flour, all-purpose flour works well. It helps the egg mixture stick to the chicken. The eggs act as a binder, making sure the breadcrumbs adhere firmly.
You can use plain breadcrumbs, but seasoned ones add extra flavor. Panko breadcrumbs are a popular choice because they create an extra crispy coating.
Beyond these, you’ll want some seasonings for flavor. Salt and pepper are must-haves. You can also add garlic powder, onion powder, or paprika for a little extra kick.
Think about what flavors your family enjoys. These simple additions elevate your chicken nuggets homemade cooking recipe from plain to amazing.
Equipment for Making Nuggets
You won’t need fancy kitchen gadgets to make these nuggets. Most kitchens have what you need. A good sharp knife is important for cutting the chicken into bite-sized pieces.
A cutting board is essential for safe food preparation. You’ll also want a few bowls for your breading station.
One bowl will hold the seasoned flour. Another bowl will have whisked eggs. A third bowl will contain the breadcrumbs and any extra seasonings.
If you plan to bake your nuggets, a baking sheet lined with parchment paper or foil will be useful. Parchment paper prevents sticking and makes cleanup easier.
If you’re frying, you’ll need a skillet or a Dutch oven for heating oil. A slotted spoon or a spider strainer will help you safely remove the cooked nuggets from the hot oil. Having these basic tools ready will make your cooking experience smooth and efficient.
Preparing The Chicken For Nuggets
Getting the chicken ready is a key step in any chicken nuggets homemade cooking recipe. This involves cutting the chicken into uniform pieces and setting up your breading station. Doing this correctly ensures all your nuggets cook evenly and have a great texture.
It’s a straightforward process that sets you up for success.
Cutting The Chicken
Start with fresh, boneless, skinless chicken breasts. Pat them dry with paper towels. This helps the breading stick better.
Trim away any excess fat or tough bits. Then, slice the chicken breasts into uniform, bite-sized pieces. About 1-inch cubes or strips work well.
Consistency in size is important. If pieces are too large, they might not cook through evenly. If they’re too small, they can dry out quickly.
Aim for pieces that are similar in thickness. This ensures they all get that perfect golden-brown crispiness at the same time.
Some people prefer to slightly freeze the chicken for about 30 minutes before cutting. This firms it up, making it easier to slice cleanly. It helps achieve those nice, neat edges.
This simple trick can make the cutting process much simpler and the final nuggets look more professional.
Setting Up Your Breading Station
A breading station makes the process of coating the chicken much more organized and efficient. You’ll typically need three shallow bowls or dishes. Set them up in a line, moving from left to right, or in whatever order is most comfortable for you.
In the first bowl, put your all-purpose flour. Season it generously with salt, pepper, garlic powder, and any other spices you like. Mix it well to distribute the seasonings evenly.
This flour layer helps the egg adhere to the chicken.
In the second bowl, whisk 2-3 eggs with a splash of milk or water. This creates your egg wash. The egg wash is the glue that holds the breadcrumbs onto the chicken.
Make sure the eggs are well beaten so they coat the chicken smoothly.
In the third bowl, place your breadcrumbs. Panko breadcrumbs are fantastic for extra crunch. You can also mix in some grated Parmesan cheese or more seasonings here.
This is where your nuggets get their signature crispy exterior. Having everything prepped makes coating the chicken a breeze.
Coating The Chicken Nuggets
Coating the chicken pieces properly is what gives homemade nuggets their satisfying crunch. It’s a three-step process that’s easy to master. Each layer plays a specific role in achieving that perfect texture and flavor.
Follow these steps to ensure your chicken is perfectly coated.
The Flour Dredge
Take your cut chicken pieces, one by one. Place them into the bowl with the seasoned flour. Toss them around until each piece is fully coated.
Gently shake off any excess flour. This initial layer of flour helps the egg wash stick to the chicken more effectively.
Don’t overload the bowl with too much chicken at once. Work in batches to ensure even coating. If the flour starts to clump, you might need to add a little more.
The goal here is a light, even coating of flour on every surface of the chicken.
Once a piece of chicken is floured and excess is shaken off, it’s ready for the next step. This first layer is crucial for building up the crust. It’s the foundation upon which the rest of the coating will adhere.
Proper flouring sets the stage for a superior coating.
The Egg Wash Dip
Next, take each floured chicken piece and dip it into the whisked egg mixture. Make sure the entire piece is covered in the egg wash. Let any excess egg drip off back into the bowl for a moment.
This moist layer is what allows the breadcrumbs to cling tightly to the chicken.
Again, work in manageable batches. Don’t let the coated chicken sit for too long before moving to the breadcrumbs. If the egg wash becomes too thick, you can add a little more milk or water.
The consistency should be just right to coat the chicken without being too runny or too gloppy.
This egg dip is what creates the adhesive surface for the final crispy layer. It ensures that every bit of the chicken is ready to receive its crunchy coating. This step is essential for preventing the breading from falling off during cooking.
The Breadcrumb Coating
Finally, take the egg-coated chicken piece and place it into the bowl of breadcrumbs. Press down gently to ensure the breadcrumbs adhere well. You want a good, even coating all over.
Once coated, place the breaded nugget onto your prepared baking sheet or a clean plate.
For an extra crispy coating, you can double-dip. After the first breadcrumb coating, dip the nugget back into the egg wash and then into the breadcrumbs again. This creates a thicker, more substantial crust.
This is a great technique for achieving that bakery-quality crunch.
Repeat this entire process for all your chicken pieces. Arrange the coated nuggets on the baking sheet so they are not touching each other. This allows air to circulate around them, leading to even cooking and crispiness.
Your chicken is now ready for the heat!
Cooking Your Homemade Chicken Nuggets
Now that your nuggets are prepped and coated, it’s time to cook them to golden perfection. There are two main methods: baking and frying. Both can yield delicious results, but they offer slightly different textures and require different approaches.
Choose the method that best suits your preference and available equipment.
Baking Nuggets For A Healthier Option
Baking is a fantastic way to make your chicken nuggets homemade cooking recipe healthier. It uses less oil and is generally easier to manage for beginners. Preheat your oven to a moderately high temperature, typically around 400°F (200°C).
Place your coated chicken nuggets on the prepared baking sheet. Make sure they have a little space between them. This allows the hot air to circulate, ensuring they bake evenly and get crispy on all sides.
You can lightly spray the tops of the nuggets with cooking spray for extra crispiness.
Bake for about 20-25 minutes. You’ll want to flip them halfway through, around the 10-12 minute mark. This ensures both sides get beautifully browned and cooked through.
The internal temperature of the chicken should reach 165°F (74°C).
Baking is great because it’s hands-off for a good portion of the cooking time. It’s also easier to cook larger batches at once. The result is a tender chicken nugget with a satisfyingly crisp exterior.
It’s a great option for busy weeknights or when you want a lighter meal.
Frying Nuggets For Ultimate Crispiness
If you’re aiming for that classic, ultra-crispy fried chicken nugget experience, frying is the way to go. You can pan-fry in a skillet or deep-fry in a Dutch oven or dedicated fryer. Heat about 1-2 inches of cooking oil in your pan over medium-high heat.
A neutral oil like vegetable, canola, or peanut oil works well. Aim for a temperature of around 350°F (175°C).
Carefully place a few nuggets into the hot oil, being careful not to overcrowd the pan. Overcrowding can cause the oil temperature to drop, leading to greasy, soggy nuggets. Fry them for about 3-5 minutes per side, or until they are golden brown and cooked through.
Use a slotted spoon or spider strainer to remove the fried nuggets from the oil. Place them on a wire rack set over a baking sheet or on a plate lined with paper towels. This allows excess oil to drain off, keeping them crispy.
Frying delivers that irresistible crunch that many people crave. It’s a quicker cooking method for smaller batches. Just be sure to do it in a well-ventilated area and exercise caution with hot oil.
The rich flavor and texture are hard to beat.
Checking For Doneness
Regardless of whether you bake or fry, ensuring your nuggets are cooked through is crucial for food safety and taste. The most reliable way is to use a meat thermometer. Insert it into the thickest part of a nugget.
The internal temperature should read at least 165°F (74°C).
Visually, cooked nuggets will be golden brown and firm to the touch. For baked nuggets, the edges will look crisp, and the coating will be set. For fried nuggets, the crust will be a deep golden color and sound crispy when tapped.
If you cut one open, the chicken inside should be white and opaque, with no pinkness.
If your nuggets are not quite done, especially after baking, you can return them to the oven for a few extra minutes. For fried nuggets, if they seem done on the outside but you suspect they aren’t cooked through, you can finish them in a preheated oven at 350°F (175°C) for a short time. Proper doneness ensures a safe and delicious meal.
Serving Your Homemade Nuggets
The best part about making your own chicken nuggets is enjoying them! They are fantastic served hot, fresh from the oven or fryer. Their crispy exterior and tender chicken inside make them a crowd-pleaser for all ages.
What you serve them with can elevate the experience even further.
Delicious Dipping Sauce Ideas
Homemade nuggets are incomplete without a selection of tasty dipping sauces. Ketchup is a classic for a reason, but don’t stop there! Consider making your own special sauces.
Barbecue sauce is another favorite. You can buy it or whip up a quick homemade version. Honey mustard is also a hit, offering a sweet and tangy flavor.
For something a little creamier, a ranch dip or a garlic aioli are excellent choices.
Here are a few ideas to get you started:
- Honey Mustard Sauce: Mix 1/4 cup Dijon mustard with 2 tablespoons honey and 1 tablespoon mayonnaise. Add a pinch of garlic powder if desired.
- Quick BBQ Dip: Combine 1/4 cup your favorite BBQ sauce with 1 tablespoon of honey or maple syrup for a touch of sweetness.
- Garlic Ranch: Stir minced garlic or garlic powder into plain ranch dressing.
- Spicy Mayo: Mix 1/4 cup mayonnaise with 1-2 teaspoons of sriracha or your favorite hot sauce.
Offering a variety of sauces allows everyone to customize their nugget experience. This makes your homemade chicken nuggets homemade cooking recipe even more fun and personal.
Perfect Sides To Pair
What to serve alongside your delicious homemade chicken nuggets? Think about classic comfort foods or healthier options that complement the nuggets well. French fries are an obvious choice, but there are many other great pairings.
For a healthier meal, consider a fresh side salad. A simple green salad with a light vinaigrette offers a refreshing contrast. Steamed vegetables like broccoli or green beans are also excellent and easy to prepare.
Other popular sides include:
- Sweet potato fries
- Macaroni and cheese
- Coleslaw
- Mashed potatoes
- Apple slices
The goal is to create a balanced and enjoyable meal. The sides should enhance the main event without overpowering it. A well-rounded meal makes your homemade nuggets a true standout.
Why Homemade Is Best
There are many reasons why making chicken nuggets at home is superior to buying them pre-made. You have complete control over the ingredients, ensuring freshness and quality. You can also tailor the flavors to your family’s preferences, making them exactly how you like them.
Homemade nuggets are often more cost-effective too. Buying chicken breasts in bulk and using pantry staples can save money compared to purchasing pre-packaged nuggets. Plus, you avoid the artificial flavors, colors, and preservatives that can be found in many commercial products.
This approach to cooking encourages healthier eating habits. It shows you and your family that delicious food can be made from scratch with simple, wholesome ingredients. It’s a rewarding way to prepare food that everyone can feel good about eating.
Common Myths Debunked
Myth 1: Homemade chicken nuggets are always dry
This is a common worry, but it’s not true for a well-made chicken nuggets homemade cooking recipe. Dryness usually comes from overcooking or using lean cuts without enough moisture. By using fresh chicken, not overcooking it, and using the right breading technique, you ensure the nuggets stay tender and juicy inside.
Myth 2: Making chicken nuggets at home is too complicated
Many people believe the process is difficult or time-consuming. However, the steps are quite simple: cut chicken, bread it, and cook it. With a little organization, like setting up a breading station, the process becomes very manageable.
It’s much less complicated than people often imagine.
Myth 3: Fried chicken nuggets are unhealthy
While frying does involve oil, homemade fried nuggets can be healthier than processed ones. You control the type and amount of oil used. Furthermore, the ingredients are fresh and free of artificial additives.
Baking offers an even healthier alternative with significantly less fat.
Myth 4: You need special equipment to make good chicken nuggets
This is simply not the case. Basic kitchen tools like a knife, cutting board, a few bowls, and a baking sheet or skillet are all you need. You don’t require professional fryers or fancy gadgets to achieve delicious results.
Simple tools yield fantastic outcomes.
Frequently Asked Questions
Question: How long can I store homemade chicken nuggets
Answer: You can store cooked homemade chicken nuggets in an airtight container in the refrigerator for up to 3-4 days. For longer storage, freeze them in a single layer on a baking sheet until solid, then transfer to a freezer bag. They can be kept frozen for up to 2-3 months.
Question: Can I use chicken thighs instead of breasts
Answer: Yes, you can use boneless, skinless chicken thighs. Thighs are naturally more moist and flavorful due to higher fat content, which can result in very tender nuggets. However, they may take slightly longer to cook than breast meat, so always check the internal temperature.
Question: What if my breading falls off during cooking
Answer: This usually happens if the chicken isn’t dried properly before flouring, or if the breading steps aren’t followed correctly. Ensure the chicken is patted dry, that each layer (flour, egg, breadcrumbs) is applied thoroughly, and that the breadcrumbs are pressed on firmly. Also, avoid overcrowding the pan if frying.
Question: Can I make these nuggets gluten-free
Answer: Absolutely! You can easily make gluten-free chicken nuggets by using gluten-free all-purpose flour and gluten-free breadcrumbs or almond flour for coating. Ensure all other ingredients are also certified gluten-free.
Question: How can I make the nuggets extra crispy
Answer: For extra crispiness, try using panko breadcrumbs, as they are lighter and create a crunchier coating. Double-dipping (flour, egg, breadcrumbs, egg, breadcrumbs) also creates a thicker, crispier crust. Baking them on a wire rack allows for better air circulation, and a final brief broil can add extra crispness without overcooking.
Wrap Up
Making chicken nuggets at home is simple and rewarding. You get delicious, crispy results with fresh ingredients. Follow these steps for a fantastic chicken nuggets homemade cooking recipe that is easy and fun.
Enjoy your tasty creations with your favorite dipping sauces!
Related Posts

Easy Crispy French Fries Cooking Recipe
Easy Onion Pakora Cooking Recipe Guide