Easy Onion Pakora Cooking Recipe Guide
Making onion pakoras might seem tricky at first, especially if you’re new to cooking. Lots of people wonder about the best way to get them perfectly crispy without being greasy. It can feel like a lot to get right.
But don’t worry! This guide breaks down the onion pakora cooking recipe into simple steps that anyone can follow. We’ll show you how to make delicious, crispy pakoras every time.
Get ready to impress yourself and your friends with this easy method.
Key Takeaways
- You will learn the core ingredients needed for a perfect onion pakora.
- This guide explains how to mix the batter for the best crispy texture.
- Discover the ideal oil temperature for frying pakoras to golden perfection.
- Get tips on serving and storing your delicious onion pakoras.
- Understand common mistakes and how to avoid them for successful pakoras.
The Basic Onion Pakora Cooking Recipe
This section covers the foundational knowledge for making delicious onion pakoras. We explore the essential components that make this snack a favorite. Understanding these basics is key to achieving great results with any onion pakora cooking recipe.
Essential Ingredients for Crispy Pakoras
To start your onion pakora adventure, gather a few simple items. You’ll need thinly sliced onions, which are the star of the show. Besan, also known as gram flour, is the binding agent that holds everything together.
Rice flour is often added to make the pakoras extra crispy. Spices like salt, red chili powder, turmeric, and carom seeds (ajwain) add that signature flavor. Sometimes, fresh cilantro or green chilies are mixed in for an extra kick.
The quality of your ingredients matters. Fresh onions will give you a better flavor than old ones. Ensure your besan is fresh and not expired, as old flour can lead to a gummy texture.
The spices should be aromatic. If you’re unsure about carom seeds, they add a unique, slightly pungent taste that is classic in pakoras. They also help with digestion, which is a nice bonus.
Quantities for About 4 Servings
Here’s a good starting point for your ingredient list. You can adjust these amounts based on how many people you’re serving or your personal taste preferences.
- 2 large onions, thinly sliced
- 1 cup besan (gram flour)
- 2 tablespoons rice flour
- 1/2 teaspoon salt (or to taste)
- 1/4 teaspoon turmeric powder
- 1/2 teaspoon red chili powder (adjust for spice level)
- 1/4 teaspoon carom seeds (ajwain), lightly crushed
- 2-3 tablespoons water (add as needed)
- Oil for deep frying
Using precise measurements helps ensure the batter consistency is just right. Too much besan can make the pakoras dense, while too little might cause them to fall apart during frying. Rice flour is important for achieving that delightful crunchiness.
Don’t skip it if you want truly crispy pakoras.
Preparing the Onion Mixture
The first step in making pakoras is preparing the onions. Thinly slicing them is crucial. You want slices that are fine enough to cook through quickly and release their moisture.
This moisture helps the besan stick to the onions. Some recipes suggest letting the sliced onions sit with salt for about 10-15 minutes. This process draws out excess water from the onions, which can prevent the pakoras from becoming soggy.
After salting, you can gently squeeze out the excess liquid.
Once your onions are sliced and lightly salted, you can add the dry ingredients. This includes the besan, rice flour, turmeric, red chili powder, and carom seeds. Gently toss everything together with your hands.
The goal is to coat each onion slice with the dry mixture. Don’t overmix at this stage. You want the onions to remain somewhat separated, not clumped into a dough.
This step is vital for the texture of the final pakora. If the onions aren’t thinly sliced, they might remain raw inside. If you add too much flour, the pakoras will be heavy.
The salt also helps to slightly soften the onions, making them more pliable. The crushed carom seeds release their aromatic oils when mixed with the other ingredients. This initial coating with dry ingredients is a key part of the onion pakora cooking recipe.
Mixing the Batter for Perfect Crispiness
Now it’s time to create the batter. Add water a tablespoon at a time to the onion and flour mixture. Mix gently.
You don’t want a thin, runny batter. It should be thick enough to coat the onions well, but not so thick that it forms a heavy dough. Think of it like a slightly sticky coating rather than a smooth batter.
The consistency is critical for achieving the desired crispiness. If the batter is too wet, the pakoras will absorb too much oil and become greasy. If it’s too dry, the coating won’t stick properly, and you’ll end up with just fried onion rings.
A good test is to pick up a few onion slices with the batter; they should be well-coated and hold their shape. You might not need all the water, or you might need a tiny bit more, depending on the moisture content of your onions.
Avoid overmixing the batter once the water is added. Excessive mixing can develop the gluten in the besan, leading to tough pakoras. Just mix until everything is combined and holds together.
Some chefs suggest letting the batter rest for a few minutes before frying. This allows the flours to absorb moisture and can improve the texture. This step is often overlooked but can make a difference in the final crunch.
Frying Your Delicious Onion Pakoras
Frying is where the magic happens. Heat oil in a deep pan or kadai over medium heat. The oil temperature is very important.
If the oil is too hot, the pakoras will brown too quickly on the outside while remaining uncooked inside. If the oil is not hot enough, they will absorb too much oil and become soggy and greasy.
A good temperature is around 350-375°F (175-190°C). You can test the oil by dropping a tiny bit of batter into it. If it sizzles and floats to the surface immediately, the oil is ready.
Be careful not to overcrowd the pan. Frying too many pakoras at once will lower the oil temperature, leading to greasy results.
Carefully drop spoonfuls of the onion mixture into the hot oil. You can use your hands to drop small portions, or a spoon. Fry them in batches.
Allow them to cook undisturbed for a few minutes until they start to firm up and turn golden brown on one side. Then, gently stir or flip them to ensure even cooking and browning.
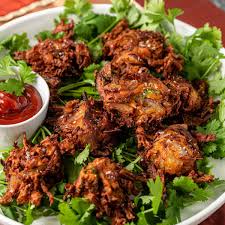
Achieving Golden Brown Perfection
This frying stage is the most critical for the success of your onion pakora cooking recipe. Patience is key. Let the pakoras fry until they are a deep golden brown color.
This usually takes about 4-6 minutes per batch, depending on their size and the oil temperature.
As the pakoras fry, they will puff up slightly and become crispy. Use a slotted spoon or a spider strainer to remove them from the oil. Place them on a wire rack set over a baking sheet, or on paper towels, to drain any excess oil.
Draining on a wire rack is better than paper towels, as it allows air to circulate and keeps the bottom from becoming soggy. This simple step ensures maximum crispiness.
Keep the fried pakoras warm while you fry the remaining batches. You can place them in a low-temperature oven (around 200°F or 95°C) on a baking sheet. This keeps them crisp until you’re ready to serve.
If you fry them until they are perfectly golden and crispy, they will retain their texture for a good while. The aroma filling your kitchen will be amazing!
Serving and Storing Your Pakoras
Onion pakoras are best served hot and fresh. The moment they come out of the oil is when they are at their peak crispiness and flavor. They are a popular snack or appetizer, especially during rainy days or festive occasions.
Serve them with your favorite chutneys or sauces.
Classic accompaniments include mint chutney, tamarind chutney, or even a simple tomato ketchup. A hot cup of tea is also a traditional pairing, especially in South Asia. The contrast between the hot tea and the crispy, savory pakoras is delightful.
The spices in the pakoras are also enhanced by the warmth of the tea.
If you have leftovers, which is unlikely, they can be stored. Let them cool completely before storing them in an airtight container at room temperature. They will lose some of their crispiness over time.
To reheat, you can place them in a preheated oven or an air fryer for a few minutes. This helps to revive their crunchiness. Avoid microwaving them, as this usually makes them soft and chewy.
Tips for Reheating and Enjoying Later
Reheating is key to enjoying pakoras that aren’t quite as fresh. The best method is to use your oven or an air fryer. Preheat your oven to around 350°F (175°C).
Spread the pakoras in a single layer on a baking sheet. Bake for 5-10 minutes, or until they are heated through and have regained some crispiness. An air fryer works even faster, usually in 3-5 minutes at around 375°F (190°C).
If you don’t have these appliances, you can try pan-frying them again over medium heat. This requires more attention to prevent burning. The goal is to re-crisp them without overcooking.
Even though they won’t be exactly like fresh pakoras, reheating properly can salvage them and make them enjoyable. This is a practical tip for any leftover pakoras.
Remember, the perfect onion pakora cooking recipe is one that results in a snack you love. So, experiment with the spice levels and ingredient additions to make it your own. The core technique remains the same for delicious results.
Enjoy your homemade pakoras!
Common Myths Debunked
Myth 1: Using only besan makes pakoras crispy.
Reality: While besan is the main flour, using a small amount of rice flour in addition to besan significantly enhances the crispiness. Rice flour has properties that help create a lighter, crunchier texture compared to besan alone. Without it, pakoras can sometimes turn out a bit chewy or dense.
Myth 2: Overcrowding the pan makes pakoras fry faster.
Reality: The opposite is true. Overcrowding the frying pan causes the oil temperature to drop significantly. This leads to the pakoras absorbing more oil and becoming greasy rather than crispy.
It’s better to fry in smaller batches to maintain the optimal oil temperature.
Myth 3: Pakoras must be eaten immediately after frying to be good.
Reality: While pakoras are best when fresh, they can be successfully reheated. Using an oven or an air fryer at a moderate temperature can help restore their crispiness. They might not be as perfectly crisp as when first fried, but reheating can salvage them for later enjoyment.
Myth 4: You need complex spices for good pakoras.
Reality: A simple combination of salt, red chili powder, and turmeric, along with carom seeds, is often all you need for authentic and delicious pakoras. The flavor primarily comes from the onions themselves and the spices that complement them. You can add other spices, but the basics are key.
Frequently Asked Questions
Question: How do I make sure my onions are sliced thinly enough?
Answer: Use a sharp knife and cut the onions with the grain. You can also use a mandoline slicer for consistent, thin slices. Aim for slices that are almost transparent.
Question: Can I use all-purpose flour instead of besan?
Answer: While you can, the texture will be different. Besan (gram flour) is traditional and gives pakoras their characteristic flavor and crispiness. All-purpose flour might result in a softer coating.
Question: My pakoras are turning dark quickly. What am I doing wrong?
Answer: Your oil is likely too hot. Lower the heat to medium. Also, ensure you are not burning the spices in the batter; add them just before frying.
Question: How long does it take to fry a batch of pakoras?
Answer: Typically, it takes about 4-6 minutes per batch. You need to fry them until they are golden brown and crispy on all sides.
Question: Can I add other vegetables to my pakora batter?
Answer: Yes, you can. Finely chopped potatoes, spinach, or cauliflower can be added. Ensure they are cut small enough to cook through with the onions.
Summary
Mastering the onion pakora cooking recipe is simple with these steps. You learned about essential ingredients, batter consistency, and perfect frying techniques. Achieving crispy, golden pakoras is within reach.
Serve them hot with your favorite dips for the best experience. Enjoy making this delightful snack!
Related Posts
Easy Homemade Chicken Nuggets Cooking Recipe

Easy Crispy French Fries Cooking Recipe