Chicken Roll Easy Cooking Recipe Simplified
Finding a great chicken roll easy cooking recipe can sometimes feel tricky, especially when you’re just starting out in the kitchen. You might worry about getting the chicken just right or making sure the roll holds its shape. But don’t worry!
This recipe is designed to be super simple. We’ll walk you through every step so you can make a delicious chicken roll without any fuss. Get ready to learn how to make a dish that’s both tasty and easy to prepare.
Key Takeaways
- You will learn the basic ingredients for a simple chicken roll.
- This post provides clear, step-by-step instructions for making chicken roll.
- Tips for ensuring your chicken roll is moist and flavorful will be shared.
- Ideas for serving your chicken roll will be explored.
- Common issues and how to avoid them are covered.
Discover Your Simple Chicken Roll Easy Cooking Recipe
This section is all about getting started with our easy chicken roll. We’ll look at what you need and why this method works so well for beginners. The goal is to make cooking fun and not overwhelming.
You’ll see that making a tasty chicken roll is totally achievable, even if you’ve never made one before. We break it down so you can follow along easily.
Gathering Your Ingredients
To make a delicious chicken roll, you need a few simple things. This recipe keeps it basic so you can focus on the steps. You’ll want boneless, skinless chicken breasts.
These are easy to work with and cook quickly. We also need some everyday seasonings to give the chicken flavor. Salt and pepper are a must.
You might also like garlic powder and onion powder. Some recipes use breadcrumbs to help bind everything and add a nice texture inside. For the outside, you’ll need a little oil for cooking.
These are all things you likely have in your pantry or can get at any grocery store.
- Chicken Breasts: About two medium chicken breasts are perfect for a small family meal.
- Seasonings: Salt, pepper, garlic powder, and onion powder are key.
- Binding Agent: Dry breadcrumbs help hold the filling together.
- Cooking Oil: A neutral oil like vegetable or canola oil works well.
Choosing good quality chicken makes a difference. Look for chicken that is pink and firm. Avoid anything that looks gray or has a strong smell.
The seasonings don’t need to be fancy. The simple combination of salt, pepper, garlic, and onion creates a wonderful savory flavor that complements the chicken without overpowering it. Breadcrumbs are important because they absorb any extra moisture from the chicken and help create a cohesive roll.
Without them, the filling might be too loose. The oil is needed to get a nice golden-brown crust when you cook the roll, adding both flavor and appearance.
Preparing the Chicken
The first step in our chicken roll easy cooking recipe is to prepare the chicken itself. This involves flattening it so it’s an even thickness. This helps the chicken cook evenly and makes it easier to roll up.
You can do this by placing the chicken breast between two pieces of plastic wrap or inside a plastic bag. Then, gently pound it with a rolling pin or the flat side of a meat mallet. You want to get it to about a quarter-inch thickness.
Don’t pound it too thin, or it might tear easily when you roll it.
Once the chicken is flattened, it’s time to season it. Sprinkle both sides evenly with salt, pepper, garlic powder, and onion powder. Make sure to get the edges too.
This is where most of the flavor comes from. Don’t be shy with the seasonings, but also don’t overdo it. A good rule of thumb is about half a teaspoon of salt and pepper per breast, and a quarter teaspoon each of garlic and onion powder.
You can always add a little more salt if you feel it needs it later, but it’s hard to take it away.
After seasoning, you’re ready to add the filling. Sprinkle a thin, even layer of dry breadcrumbs over one side of each chicken breast. Leave a small border around the edges, about half an inch.
This helps prevent the filling from squeezing out when you roll it. The breadcrumbs will absorb some of the juices released during cooking, keeping the inside moist and adding a nice texture. They also help the roll hold its shape better.
The Simple Rolling Technique
Now for the part that gives this dish its name: rolling the chicken. This step might seem a little tricky, but it’s actually quite straightforward. The key is to start at one end and roll tightly.
This helps create a neat package and ensures that the filling stays inside during cooking. A tight roll also makes for even cooking and a pleasing presentation.
Begin by lifting the edge of the chicken closest to you that has the breadcrumbs. Gently tuck in the sides of the chicken towards the center. This creates a more compact roll.
Then, start to roll the chicken away from you, keeping the roll as snug as possible. If the chicken starts to tear, don’t panic. You can usually press it back together.
If it’s too difficult to roll, you might have pounded the chicken too thin, or you might need to adjust your filling amount. A little practice makes perfect here.
Once you have a rolled chicken breast, you can secure it if needed. Some people like to tie them with kitchen twine to make sure they stay rolled during cooking. This is especially helpful if your chicken was a bit fragile or you didn’t tuck in the sides perfectly.
However, if you rolled it tightly and didn’t overfill it, kitchen twine might not be necessary. You can also use toothpicks to hold the seam shut, though be sure to remove them before serving.
Securing Your Chicken Rolls
Securing the chicken rolls is an optional but recommended step for a foolproof chicken roll easy cooking recipe. This ensures that your delicious filling doesn’t escape during the cooking process, leaving you with a beautifully shaped and intact chicken roll. There are a couple of simple ways to do this that don’t require any special skills.
- Kitchen Twine: Cut several pieces of kitchen twine, each about 12 inches long. Wrap one piece around the middle of the chicken roll, tying it securely. You can add another piece near each end if your roll is very long or seems like it might come apart. This method creates a professional look and holds the roll firmly.
- Toothpicks: If you don’t have kitchen twine, toothpicks are a great alternative. Insert them through the seam of the rolled chicken, spaced a few inches apart. This will hold the edges together. Remember to remove the toothpicks before you serve the chicken.
- Pounding Technique: Sometimes, simply pounding the chicken to an even thickness and tucking in the sides well enough can make securing unnecessary. The natural stickiness of the chicken and the breadcrumbs can help it stay together.
The choice between twine and toothpicks often comes down to personal preference and what you have on hand. Kitchen twine provides a very neat finish, resembling something you might find in a restaurant. It distributes pressure evenly around the roll.
Toothpicks are more readily available in most kitchens and are effective for holding the seam. Just be sure to make a mental note (or a physical one!) of where you put them so you don’t forget to pull them out before someone takes a bite. For absolute beginners, using kitchen twine or toothpicks is a good idea to build confidence and ensure success with your first attempt at this easy recipe.
Cooking Your Chicken Rolls
Now it’s time to cook your prepared chicken rolls. You have a few options, but pan-frying is a quick and effective method that gives a lovely golden-brown crust. Heat a tablespoon or two of vegetable oil in a non-stick skillet over medium-high heat.
Once the oil is shimmering, carefully place the chicken rolls seam-side down into the skillet. This helps seal the seam and prevents it from opening up.
Sear the chicken rolls for about 3-4 minutes per side, until they are golden brown all over. This step is crucial for developing flavor and texture. After searing, you can reduce the heat to medium-low.
You can add a splash of chicken broth or water to the pan and cover it. This creates steam, which helps the chicken cook through evenly without drying out. Let them simmer gently for about 15-20 minutes, or until the chicken is cooked through.
The internal temperature should reach 165 degrees Fahrenheit (74 degrees Celsius).
Another option is baking. Preheat your oven to 375 degrees Fahrenheit (190 degrees Celsius). Place the secured chicken rolls on a baking sheet lined with parchment paper.
Bake for 25-30 minutes, or until the chicken is cooked through and golden. Baking is a hands-off method that’s great if you’re preparing other dishes at the same time. No matter which method you choose, the important thing is to ensure the chicken is fully cooked and no longer pink inside.
Serving Your Delicious Chicken Roll
Once your chicken rolls are cooked, it’s time to enjoy them! Let them rest for a few minutes before slicing. This allows the juices to redistribute, making the chicken more tender and moist.
If you used kitchen twine or toothpicks, remove them carefully now.
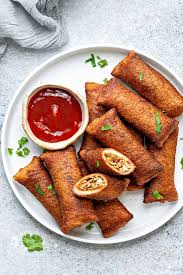
To serve, you can slice the chicken rolls into thick rounds, about one inch thick. This shows off the beautiful spiral of the filling inside. They look very appealing when sliced and plated.
The golden-brown exterior and the moist, flavorful interior make for a satisfying meal.
Accompaniments and Presentation
Your chicken roll is versatile and pairs well with many sides. Mashed potatoes are a classic choice. Roasted vegetables like broccoli, carrots, or asparagus also make a healthy and colorful addition to the plate.
A simple green salad with a vinaigrette dressing provides a fresh contrast.
- Mashed Potatoes: Creamy mashed potatoes are a perfect comfort food to go with your chicken roll.
- Roasted Vegetables: Toss your favorite vegetables with a little olive oil, salt, and pepper and roast them until tender.
- Steamed Rice: For a lighter option, plain or seasoned steamed rice is a great pairing.
- Gravy or Sauce: A simple pan sauce made from the drippings in the skillet, or a mushroom gravy, can add extra flavor.
Presentation can elevate your meal. Arrange the sliced chicken rolls artfully on the plate. Garnish with fresh herbs like parsley or chives for a pop of color.
A drizzle of sauce over the top can also make the dish look more appealing. The visual appeal of a well-made chicken roll, with its distinct layers and golden crust, is often the first thing that draws people in. The simple act of slicing it to reveal the cooked chicken and breadcrumb filling makes it a delightful dish to serve to family and friends.
It looks more complicated to make than it actually is, making it a great option for impressing guests without a lot of stress.
Common Myths Debunked
Myth 1: Chicken rolls are difficult to roll tightly without falling apart.
Reality: While it might take a little practice, rolling chicken tightly is quite achievable. The key is to pound the chicken to an even thickness and tuck in the sides before rolling. Using kitchen twine or toothpicks can also provide extra security.
Many people find that after one or two tries, the process becomes second nature. The breadcrumbs also help create a slightly sticky surface that aids in adhesion.
Myth 2: You need fancy ingredients to make a good chicken roll.
Reality: This chicken roll easy cooking recipe proves that you don’t need exotic ingredients. Basic seasonings like salt, pepper, garlic powder, and onion powder, along with common pantry staples like breadcrumbs, are all you need to create a flavorful chicken roll. The focus is on simple, fresh ingredients and proper cooking techniques.
Myth 3: Chicken rolls can easily become dry and tough.
Reality: Dry chicken rolls are usually a result of overcooking or not using enough moisture during the cooking process. By pounding the chicken evenly and not overcooking it, you can ensure it stays moist. Using methods like pan-simmering with a lid or finishing in the oven with a bit of liquid can help retain moisture.
The breadcrumbs inside also act as a moisture absorber, keeping the inside tender.
Frequently Asked Questions
Question: What is the best cut of chicken for a chicken roll?
Answer: Boneless, skinless chicken breasts are the best choice for chicken rolls because they are easy to flatten and roll evenly.
Question: How can I make sure the chicken roll doesn’t leak filling?
Answer: Pound the chicken to an even thickness, tuck in the sides before rolling, and don’t overfill it. Securing with kitchen twine or toothpicks also helps.
Question: Can I prepare the chicken rolls ahead of time?
Answer: Yes, you can prepare the chicken rolls and refrigerate them for a few hours before cooking. This can even help the flavors meld.
Question: What if my chicken roll tears while rolling?
Answer: Don’t worry! Gently press the torn parts back together. The breadcrumbs will help seal it, and kitchen twine or toothpicks can offer extra support.
Question: How do I know when the chicken roll is fully cooked?
Answer: The chicken roll is fully cooked when it reaches an internal temperature of 165 degrees Fahrenheit (74 degrees Celsius). The juices should run clear, and the chicken should no longer be pink inside.
Summary
You’ve learned how to make a simple and delicious chicken roll. From gathering basic ingredients to rolling and cooking, this recipe is designed for ease. Follow these steps for a tasty meal that’s perfect for any occasion.
Enjoy your homemade chicken roll!
Related Posts
Easy Homemade Chicken Nuggets Cooking Recipe

Easy Crispy French Fries Cooking Recipe