Easy Beef Singara Cooking Recipe Guide
Learning the beef singara cooking recipe can seem tricky at first. Many people think making these delicious fried pastries is hard, but it’s not! We’ll walk you through every step.
You’ll see how simple it is to get perfect beef singaras every time. Get ready to make them yourself!
Key Takeaways
- You will learn the basic ingredients needed for beef singara.
- Discover simple methods for preparing the beef filling.
- Understand how to make the dough for a crispy outer shell.
- Follow clear instructions for shaping and sealing the singaras.
- Learn the best way to fry your beef singaras to golden perfection.
- Get tips to ensure your beef singara cooking recipe turns out great.
The Ultimate Beef Singara Cooking Recipe
Gathering Your Beef Singara Ingredients
Making a great beef singara starts with having the right things. You’ll need ingredients for both the filling and the outer dough. For the filling, ground beef is key.
You will also need onions, garlic, ginger, and a mix of spices. Common spices include cumin, coriander, turmeric, chili powder, and garam masala. Fresh cilantro adds a nice touch.
For the dough, you’ll need all-purpose flour, salt, and some fat like oil or ghee. Water is needed to bring the dough together.
Choosing fresh, good-quality ingredients makes a big difference in the final taste. The type of beef you use can also impact the texture. Lean ground beef is often preferred to avoid greasiness.
If you like a little heat, adjust the chili powder to your liking. Don’t forget salt to bring out all the flavors. Having everything ready before you start cooking will make the process much smoother.
Essential Filling Components
The heart of any good beef singara is its savory filling. Ground beef is the star here. Aim for about a pound of good quality ground beef.
This will give you enough filling for a decent batch of singaras. You’ll also need finely chopped onions, which add sweetness and depth when cooked down. Garlic and ginger are non-negotiable flavor builders.
Minced garlic and ginger paste add that essential aromatic base.
The spice blend is where the magic happens. Cumin seeds or powder offer an earthy note. Coriander powder adds a citrusy, warm flavor.
Turmeric powder not only gives a beautiful golden hue but also has a slightly peppery taste. Chili powder provides heat, which you can adjust. Garam masala, a blend of ground spices, adds a fragrant warmth that is characteristic of many South Asian dishes.
A pinch of salt is crucial to enhance all these flavors. Some recipes also call for a touch of sugar to balance the spices and acidity.
Creating the Perfect Dough
The dough for singaras needs to be firm enough to hold its shape during frying and have a nice crispness. All-purpose flour is the standard base. You’ll need around two cups of flour.
A pinch of salt is added for flavor. To make the dough crispy and flaky, you need to add a fat. This can be oil, like vegetable or canola oil, or clarified butter (ghee).
Ghee often gives a richer flavor and crispier texture.
The ratio of fat to flour is important. Too little fat, and the dough won’t be crispy. Too much, and it can become oily.
You’ll rub the fat into the flour until it resembles coarse breadcrumbs. Then, you’ll gradually add cold water, a little at a time, mixing until a firm, smooth dough forms. It’s important not to overwork the dough, as this can make it tough.
A firm dough is essential for shaping and preventing leaks during frying.
Preparing the Flavorful Beef Filling
Now it’s time to bring those filling ingredients together. Heat a tablespoon of oil in a pan over medium heat. Add your chopped onions and sauté until they are soft and translucent, about 5-7 minutes.
This process softens the onions and brings out their natural sweetness. Then, add the minced garlic and ginger. Cook for another minute until they are fragrant, being careful not to burn them.
Add the ground beef to the pan. Break it up with your spoon and cook until it’s browned. Drain any excess fat from the pan.
This step is important for preventing oily singaras. Now, add your spices: cumin, coriander, turmeric, chili powder, garam masala, and salt. Stir everything well to coat the beef evenly.
Cook for another 5 minutes, allowing the spices to meld with the beef. Finally, stir in fresh chopped cilantro if you’re using it. Let the filling cool completely before you start stuffing the singaras.
This prevents the dough from becoming soggy.
Cooking the Aromatics
The foundation of a flavorful filling starts with properly cooked aromatics. Onions, garlic, and ginger are the trifecta that build depth. When you sauté the onions until they are soft and slightly golden, you caramelize their natural sugars.
This creates a sweet, savory base that is far more complex than raw onion. It also mellows out any harshness, making the overall flavor profile smoother.
Adding minced garlic and ginger after the onions have softened is key. These potent aromatics release their essential oils when heated, perfuming the entire dish. It’s vital to cook them for just about a minute.
Overcooking garlic and ginger can make them bitter, which will negatively affect your singara filling. The goal is a fragrant, sweet, and savory foundation that will complement the beef perfectly.
Browning and Spicing the Beef
Once your aromatics are ready, it’s time to add the star ingredient: ground beef. Browning the beef is more than just cooking it; it’s about developing flavor. As the meat cooks, the Maillard reaction occurs, creating those delicious browned bits and rich, savory notes.
Breaking up the meat into smaller pieces ensures even cooking and a good texture for the filling.
Draining excess fat after browning is a practical step that significantly improves the final product. It prevents the singaras from becoming overly greasy, making them more pleasant to eat and easier to handle. After draining, it’s time to introduce the symphony of spices.
Stirring in cumin, coriander, turmeric, chili powder, and garam masala coats every piece of beef. Cooking these spices with the meat for a few minutes allows their flavors to bloom and become deeply infused into the filling.
Cooling the Filling
This step is crucial for a good beef singara. Hot filling will steam the dough from the inside, making it soft and potentially tearing it. Letting the filling cool completely to room temperature, or even chilling it slightly, makes it easier to handle and work with.
It also prevents the hot steam from escaping prematurely and softening the dough shell.
When the filling has cooled, its texture becomes more manageable. It holds its shape better when you spoon it into the dough pockets. This also means less moisture will be released into the dough during the cooking process.
A well-cooled filling is a secret to achieving that perfect crispy singara shell that stays intact.
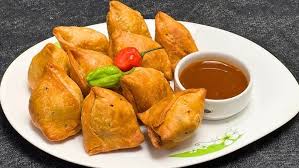
Shaping Your Delicious Beef Singaras
With your filling cooled and your dough ready, it’s time to shape the singaras. Take small portions of the dough and roll them into thin circles, about 4-5 inches in diameter. You can use a rolling pin for this.
Alternatively, you can divide the dough into small balls and flatten them into discs with your hands. The thickness of the dough is important; it shouldn’t be too thick or too thin.
Place a spoonful of the cooled beef filling in the center of each dough circle. Don’t overfill, or it will be hard to seal. Moisten the edges of the dough circle with a little water.
Fold the dough over the filling to create a semi-circle shape. Press the edges firmly to seal them. You can crimp the edges with a fork or by making small pleats to ensure a secure seal and a decorative finish.
This prevents the filling from leaking out during frying. Aim for a consistent size for even cooking.
Making the Dough Circles
The foundation of a well-shaped singara is the dough disc. Start by dividing your prepared dough into equal-sized portions. The size of your portions will determine the final size of your singaras.
For a standard singara, aim for portions that can be rolled into circles about 4 to 5 inches in diameter.
You can roll these out using a traditional rolling pin on a lightly floured surface. Aim for an even thickness, about 1/8 inch. If the dough is too thick, the singara will be doughy.
If it’s too thin, it might tear easily during filling or frying. Some cooks prefer to use the side of a glass or a cookie cutter to get perfectly round circles after rolling, ensuring uniformity.
Filling and Sealing Techniques
Once you have your dough circles ready, it’s time for the filling. Take a portion of your cooled beef filling and place it on one half of the dough circle, leaving a border around the edges. The amount of filling should be generous enough to be satisfying, but not so much that it bursts out.
A tablespoon or two is usually sufficient for a 4-5 inch circle.
To seal, lightly brush the edges of the dough with water. This acts as a natural adhesive. Fold the other half of the dough over the filling, creating a semi-circular shape.
Press the edges together firmly to seal. To make the seal more secure and give it a decorative look, you can crimp the edges. Use the tines of a fork to press down along the seam, or gently fold and pinch the edge to create small pleats.
This pleating method is traditional and helps ensure the singara won’t open during the hot frying process.
Ensuring a Secure Seal
A secure seal is paramount for successful singara frying. If the edges are not properly sealed, the hot oil can seep into the singara, making the filling soggy and potentially causing it to burst. The water acts as an effective glue, but proper technique is key.
After folding the dough, press down along the entire seam with your fingers. This expels any trapped air and ensures good contact between the dough layers. For added security, the crimping or pleating method is highly recommended.
Not only does it add a beautiful, traditional look, but it also creates multiple layers of sealing, making it very difficult for the oil to penetrate. A well-sealed singara guarantees a crisp exterior and a perfectly contained, delicious filling.
Frying Your Perfect Beef Singaras
Frying is the final step to achieving that golden-brown, crispy exterior. Heat enough cooking oil in a deep pan or wok over medium heat. The oil should be hot enough to sizzle when you drop a small piece of dough into it, but not so hot that it smokes.
A temperature of around 325-350°F (160-175°C) is ideal.
Carefully place a few singaras into the hot oil, making sure not to overcrowd the pan. Overcrowding lowers the oil temperature, leading to greasy singaras. Fry them for about 4-6 minutes per side, or until they are golden brown and crispy.
Use a slotted spoon to gently turn them over. Once they are cooked to perfection, remove them from the oil and place them on a wire rack lined with paper towels to drain any excess oil. Serve them hot.
Heating the Oil to the Right Temperature
Achieving the correct oil temperature is critical for perfect frying. If the oil is too cold, your singaras will absorb too much oil, becoming greasy and soggy. They won’t develop that desirable crispiness.
If the oil is too hot, the outside of the singara will cook too quickly and burn before the inside is heated through, and the dough might not cook evenly.
A good test is to drop a tiny piece of dough into the oil. It should sink slightly and then rise to the surface, bubbling gently. This indicates the oil is ready.
Using a kitchen thermometer is the most accurate way to monitor the temperature, aiming for the 325-350°F (160-175°C) range. Maintaining this temperature throughout the frying process is key to consistent results. You may need to adjust the heat slightly as you fry batches.
Frying Techniques for Crispiness
The art of frying singaras lies in achieving that delightful crispiness. When you place the shaped singaras into the hot oil, resist the urge to stir them immediately. Let them develop a firm crust first.
This allows the dough structure to set, preventing them from breaking apart.
Fry the singaras in batches. This is crucial. If you overcrowd the pan, the oil temperature will drop significantly.
This leads to uneven cooking and greasy results. As the singaras cook, gently turn them over with a slotted spoon or tongs to ensure even browning on all sides. The total frying time is usually between 8 to 12 minutes, depending on their size and the oil temperature.
Draining and Serving
Once your singaras have achieved a beautiful golden-brown color and feel crisp to the touch, it’s time to remove them from the oil. Using a slotted spoon or a spider strainer, carefully lift them out. This allows excess oil to drip back into the pan.
Place the fried singaras on a wire rack set over a baking sheet. This allows air to circulate around them, preventing them from becoming soggy from trapped steam. If you don’t have a wire rack, placing them on paper towels on a plate is the next best option, but they might absorb a bit more oil.
Serving them hot is when they are at their best, offering that satisfying crunch and warm, flavorful filling.
Tips for a Successful Beef Singara Cooking Recipe
Even with a great recipe, a few extra tips can elevate your beef singara game. Make sure your dough is firm. A soft dough will be difficult to work with and might not achieve the desired crispness.
If your dough feels too sticky, add a tiny bit more flour. If it feels too dry, add a drop of water.
Don’t rush the cooling of the filling. This is a common mistake that leads to soggy singaras. A completely cooled filling ensures a crisp shell.
When frying, maintain a consistent oil temperature. If the oil gets too hot, lower the heat; if it gets too cool, increase it. Be patient and fry in batches.
This is the secret to getting evenly golden and crispy singaras every time.
Maintaining Dough Consistency
The texture of your singara dough is fundamental to its success. A dough that is too soft or sticky will be challenging to roll out thinly and will likely tear when you try to seal it. This can lead to leaks during frying and a less-than-ideal final product.
On the other hand, a dough that is too stiff might be hard to work with and could result in a tougher crust if overmixed.
The key is to achieve a firm, pliable dough. When you first mix it, it should feel cohesive but not sticky. If it’s too wet, gently knead in a teaspoon of flour at a time until it reaches the right consistency.
If it’s too dry and crumbly, add water, a few drops at a time, until it comes together smoothly. Always let the dough rest for at least 30 minutes before rolling. This allows the gluten to relax, making it easier to roll out thinly without shrinking back.
Importance of Filling Temperature
The temperature of your beef filling plays a significant role in the outcome of your singaras, particularly regarding the crispness of the outer shell. If you fill the dough wrappers with hot or even warm filling, the heat will immediately begin to steam the dough from the inside. This moisture seeps into the dough structure, softening it and preventing it from achieving that desirable crispiness.
Furthermore, hot filling can cause condensation to build up inside the wrapper, which can lead to the dough becoming soggy. By ensuring your beef filling is completely cooled to room temperature, or even chilled slightly, you eliminate this risk. The cooler filling will not transfer excessive moisture to the dough, allowing it to fry up perfectly crisp and golden brown.
This simple step is one of the most effective ways to ensure success.
Batch Frying and Oil Management
Frying in batches is not just a recommendation; it’s a fundamental principle for achieving perfectly cooked singaras. When you place too many singaras into the hot oil at once, you dramatically lower the oil’s temperature. This causes the singaras to absorb more oil, making them greasy and preventing them from crisping up properly.
Instead, they essentially “boil” in the oil rather than fry.
Aim to fry no more than 3-4 singaras at a time, depending on the size of your pan. This allows the oil to maintain its optimal frying temperature. Keep an eye on the oil temperature throughout the frying process.
If it starts to drop too much, give the oil time to reheat before adding the next batch. Proper oil management ensures that each batch of singaras cooks evenly and develops that beautiful golden-brown, crispy texture that is so sought after.
Common Myths Debunked
Myth 1: Beef Singaras Are Too Difficult To Make At Home
Many people believe that making beef singaras at home is an incredibly complicated process reserved for experienced cooks. This is a misconception. While they might seem intimidating, following a clear beef singara cooking recipe with step-by-step instructions makes them very achievable for home cooks of all skill levels.
The process is broken down into manageable stages: preparing the filling, making the dough, shaping, and frying. Each stage is straightforward when explained simply.
Myth 2: You Need Special Equipment to Make Singaras
Some might think you need fancy gadgets or professional kitchen tools to create authentic beef singaras. This is untrue. Standard kitchen equipment is all you need.
A mixing bowl, a rolling pin, a frying pan or wok, and a slotted spoon are the primary tools. Even the shaping can be done with just your hands and a fork for crimping. The focus is on technique and ingredients, not specialized gear.
Myth 3: Singaras Are Always Greasy
It’s a common complaint that fried snacks are oily. However, greasy singaras are usually a result of incorrect cooking techniques, not an inherent flaw in the recipe. Frying at the wrong oil temperature (too low) or overcrowding the pan are the main culprits.
When fried at the correct temperature and in batches, singaras should be crisp and only lightly coated in oil, not saturated.
Myth 4: The Dough Must Be Fried Immediately After Making
Some believe the singara dough needs to be used right away. In reality, most doughs benefit from a resting period. Allowing the dough to rest for at least 30 minutes helps the gluten relax, making it much easier to roll out thinly and evenly.
This resting period does not negatively affect the crispiness; in fact, it often improves it by allowing for a thinner, more uniform wrapper.
Frequently Asked Questions
Question: What kind of beef is best for singara filling?
Answer: Lean ground beef is generally recommended for beef singara filling. It provides good flavor without making the filling excessively greasy, which can affect the crispness of the outer shell.
Question: How can I prevent my singaras from bursting during frying?
Answer: Ensure your singaras are sealed very well. Press the edges firmly and consider crimping them with a fork or pleating them. Also, do not overfill them, as this puts stress on the seal.
Question: My singaras are not crispy. What could be wrong?
Answer: This is usually due to frying in oil that is not hot enough, or overcrowding the pan. Make sure your oil is at the correct temperature (around 325-350°F or 160-175°C) and fry in small batches.
Question: Can I make the beef filling ahead of time?
Answer: Yes, you can prepare the beef filling a day in advance and store it in the refrigerator. Ensure it cools completely before refrigerating and is brought back to room temperature or slightly warmed before using to fill the singaras.
Question: What can I serve with beef singaras?
Answer: Beef singaras are delicious served with various chutneys like mint chutney, tamarind chutney, or a simple tomato ketchup. A side of fresh salad also complements them well.
Wrap Up
Mastering the beef singara cooking recipe is totally achievable. You learned how to pick ingredients, make a flavorful filling, and form perfect crispy shells. The key is attention to detail in sealing and frying.
Now you can confidently make these amazing treats at home for everyone to enjoy. Give it a try!
Related Posts
Easy Homemade Chicken Nuggets Cooking Recipe

Easy Crispy French Fries Cooking Recipe