Easy Chicken Samosa Cooking Recipe Guide
Making chicken samosas might seem tricky at first, especially if you’re new to cooking. Getting the filling just right and then folding the pastry perfectly can feel like a puzzle. But don’t worry!
This guide is here to make the whole process super simple. We’ll walk through every step together, so you can easily create delicious chicken samosas right in your own kitchen. Get ready to learn how to make this popular snack a success!
Key Takeaways
- You will learn the essential ingredients for a flavorful chicken samosa filling.
- Discover the best methods for preparing and cooking the chicken for samosas.
- Master the technique of folding samosa pastry to get perfect shapes.
- Understand the optimal frying or baking methods for crispy samosas.
- Get tips for serving and storing your homemade chicken samosas.
Mastering the Chicken Samosa Cooking Recipe
Embarking on the culinary adventure of making chicken samosas can be incredibly rewarding. This popular snack, enjoyed across many cultures, offers a delightful blend of savory spiced chicken encased in a crispy, golden pastry. For many home cooks, especially beginners, the process might appear daunting.
Concerns often arise around achieving the perfect spice balance in the filling, preventing the pastry from becoming soggy, and mastering the art of folding the samosas into their classic triangular shape. This guide aims to demystify the entire chicken samosa cooking recipe, breaking it down into manageable steps.
We will explore each component of the samosa making process, from selecting the right ingredients to the final cooking stage. Our focus will be on clarity and simplicity, ensuring that even those with limited cooking experience can confidently follow along. You’ll learn about the specific spices that give samosas their characteristic flavor, how to handle the dough for optimal crispiness, and techniques to ensure your chicken filling is both moist and flavorful.
By the end of this guide, you will possess the knowledge and confidence to recreate delicious, authentic-tasting chicken samosas at home.
Essential Ingredients for Chicken Samosas
Creating delicious chicken samosas starts with gathering the right ingredients. These components work together to build the signature taste and texture we all love. Having everything ready before you begin cooking makes the entire process smoother and more enjoyable.
Let’s look at what you’ll need for both the filling and the pastry.
For the filling, the star is, of course, the chicken. Ground chicken or finely chopped chicken breast and thighs work best, as they cook quickly and evenly within the pastry. Beyond chicken, a medley of spices is crucial.
Common spices include cumin, coriander, turmeric, garam masala, red chili powder, and finely chopped ginger and garlic. These aromatics provide warmth and depth. Fresh herbs like cilantro and mint add brightness and a refreshing counterpoint to the spices.
Onions, sautéed until golden, add a subtle sweetness and bind the filling together. Peas are often included for color and a slight sweetness. A squeeze of lemon juice at the end can elevate all the flavors.
The pastry is equally important. While you can buy pre-made samosa wrappers (often called spring roll wrappers or pastry sheets), making your own dough from scratch provides a superior texture and flavor. A simple dough typically consists of all-purpose flour (maida), a bit of oil or ghee for tenderness, and salt.
Water is used to bind it all into a firm, yet pliable dough. The fat content in the dough is key; too little and it will be tough, too much and it might become greasy. Getting this balance right is part of the art.
Spice Blend Breakdown
The soul of any samosa lies in its spice blend. It’s not just about heat; it’s about creating a complex, aromatic profile that is both comforting and exciting. Each spice plays a specific role in building this flavor.
Understanding these roles can help you adjust the blend to your personal taste.
-
Cumin: Ground cumin provides an earthy, warm, and slightly smoky flavor. It’s a foundational spice in many Indian dishes and adds a distinctive savory note to the samosa filling. It helps to meld the other flavors together.
A little goes a long way, and freshly toasted and ground cumin is always best for maximum aroma.
-
Coriander: Ground coriander offers a citrusy, slightly sweet, and floral aroma. It complements cumin beautifully, adding a lighter, brighter dimension to the spice mix. It also has a subtle warming effect without being spicy.
Its presence balances the earthiness of cumin and the heat of chili.
-
Turmeric: This vibrant yellow spice is known for its earthy, slightly peppery flavor and its beautiful color. Turmeric not only adds a lovely golden hue to the chicken filling but also provides anti-inflammatory benefits. It has a distinct aroma that is often described as slightly bitter or mustard-like when raw, but mellows out when cooked.
-
Garam Masala: This is a blend of ground spices, typically including cinnamon, cloves, cardamom, and black pepper. Its exact composition varies by region and family. Garam masala adds a complex, warm, and fragrant finish to the filling, often added towards the end of cooking to preserve its delicate aromas.
It provides a sweet and pungent aroma.
-
Red Chili Powder: This provides the heat. The type of chili powder used will determine the level of spiciness. Kashmiri chili powder is often preferred for its vibrant color and moderate heat.
You can adjust the amount to your preference. For a milder taste, use less or a milder variety.
Preparing the Chicken Filling
The chicken filling is the heart of your chicken samosa. Getting it right means it will be moist, flavorful, and hold its shape well when folded into the pastry. This section will guide you through preparing this key component, ensuring your samosas are a hit.
Start with your chicken. Whether you’re using ground chicken or finely chopping chicken pieces, ensure it’s prepared to a size that will cook evenly and be easy to eat. If using whole chicken pieces, mince them very finely or pulse them in a food processor until they resemble coarse ground meat.
This ensures they cook through quickly within the samosa’s pastry shell.
Next, sauté your aromatics. Finely chop one medium onion. In a pan, heat a tablespoon of oil or ghee over medium heat.
Add the chopped onions and sauté until they become soft and translucent, about 5-7 minutes. Then, add minced ginger and garlic (about 1 teaspoon each) and cook for another minute until fragrant. Be careful not to burn the garlic.
Now it’s time to cook the chicken. Add the ground or finely chopped chicken to the pan with the onions, ginger, and garlic. Break up any clumps with your spoon.
Cook the chicken, stirring occasionally, until it is no longer pink and is fully cooked through. This usually takes about 8-10 minutes for ground chicken. Drain off any excess fat if necessary.
Introduce the spices to the cooked chicken. Add your ground cumin, coriander, turmeric, red chili powder, and garam masala. Stir everything well to ensure the spices coat the chicken evenly.
Cook for another 2-3 minutes, allowing the spices to toast slightly and release their aromas. This step is vital for developing a deep flavor profile.
Finally, finish the filling. Stir in fresh chopped cilantro and mint. If you are adding peas, you can add them now and cook for a few more minutes until tender.
Add salt to taste. A squeeze of fresh lemon juice at the very end brightens all the flavors. Let the filling cool completely before you start assembling the samosas.
Warm filling can make the pastry tough or tear it.
Cooking Chicken Safely
Ensuring chicken is cooked thoroughly is paramount for both taste and safety. Undercooked chicken can harbor harmful bacteria. For samosas, this means the chicken filling must be cooked through before assembly.
Ground chicken cooks relatively quickly. You can tell it’s done when there is no pink visible and the juices run clear. For finely chopped chicken pieces, ensure they are opaque throughout.
If you are unsure, you can use a meat thermometer. The internal temperature should reach 165°F (74°C).
It’s important to cook the chicken in a way that it doesn’t release too much moisture into the filling. Overly wet filling can make the samosa pastry soggy, which is something we want to avoid. After cooking the chicken, if there is a lot of liquid, you can drain it off.
However, the goal is to have a moist but not wet filling. The spices and sautéed aromatics help to absorb some of the moisture and add flavor.
The spices are cooked with the chicken for a few minutes. This process, known as blooming, helps to release the essential oils in the spices, intensifying their flavor and aroma. This makes the filling much more delicious.
The final addition of fresh herbs and lemon juice at the end adds a burst of freshness that complements the cooked spices and chicken.
Making the Samosa Pastry
The pastry is the crispy shell that holds the delicious chicken filling. Whether you opt for store-bought wrappers or make your own dough, understanding how to handle it is key to achieving perfectly crisp samosas. We’ll cover both approaches.
If you are using pre-made samosa wrappers, often found in the freezer section of Asian or international grocery stores, the process is quite straightforward. These wrappers are typically thin, square, and designed for frying or baking. Keep them covered with a damp cloth or plastic wrap while you work to prevent them from drying out.
If they are frozen, thaw them according to package instructions. They are usually ready to use once thawed.
For those who prefer making their own dough, it’s simpler than you might think. In a mixing bowl, combine 2 cups of all-purpose flour (maida) with 1/2 teaspoon of salt. Add 2 tablespoons of vegetable oil or ghee.
Rub the fat into the flour with your fingertips until the mixture resembles coarse breadcrumbs. Gradually add cold water, about 1/4 cup at a time, mixing until a firm dough forms. Knead the dough on a lightly floured surface for about 5-7 minutes until it is smooth and elastic.
Cover the dough with a damp cloth and let it rest for at least 30 minutes. This resting period is crucial for gluten to relax, making the dough easier to roll and preventing it from shrinking too much.
Once your dough has rested, divide it into small portions, roughly the size of a golf ball. Roll each portion into a thin circle, about 6-7 inches in diameter. You can also roll out a larger sheet and cut circles from it.
The thickness of the pastry is important; aim for about 1/16th of an inch. Too thick and it will be doughy, too thin and it might tear or become too crispy.
Handling Dough for Crispiness
The secret to crispy samosas lies in how the dough is handled. For homemade dough, the addition of fat (oil or ghee) is crucial. It helps to tenderize the pastry and makes it crispier when cooked.
The amount of fat should be just enough to create a tender dough, but not so much that it becomes greasy. Too little fat will result in a tough pastry.
When rolling out the dough, aim for an even thickness. If you’re using a rolling pin, apply consistent pressure. If you have a pasta maker, you can use it to get very even sheets of dough.
After rolling, cut out circles. These circles will be cut in half to form the cone shape for filling. Ensure the edges are not too dry, as this can prevent them from sealing properly.
If you are using store-bought wrappers, handle them gently. They are already thin and meant to crisp up beautifully. The key is to keep them moist until they are filled and sealed.
If they start to dry out, they can crack when folded or sealed. A little water or the paste made from flour and water is used to seal them. This seal needs to be secure to prevent the filling from escaping during cooking.
The cooking method itself also greatly contributes to crispiness. Frying in hot oil creates a rapid crisping effect. Baking, while healthier, requires ensuring the oven is hot enough and the samosas are brushed with oil or ghee to achieve a golden-brown, crispy exterior.
The pastry needs to be cooked thoroughly to achieve that desirable crunch.
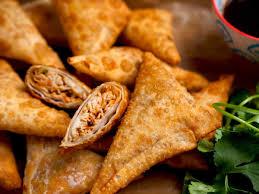
Assembling and Folding Samosas
This is where the magic happens! Turning your filling and pastry into the iconic samosa shape requires a little practice, but it’s very satisfying once you get the hang of it. We’ll break down the folding technique into simple steps.
To begin assembling, take one half of a pastry circle (if using homemade dough cut into semi-circles) or one pre-made wrapper. If using homemade dough, ensure the edges are lightly moistened with water. If using store-bought wrappers, they are often ready to use.
Take one semi-circle of pastry and bring the two straight edges together to form a cone shape. Use a little water or a flour-water paste to seal the seam. Pinch it firmly to ensure it holds its shape.
The cone should be open at the wider end and pointed at the bottom.
Now, it’s time to fill the cone. Spoon your cooled chicken filling into the cone. Don’t overfill it, as this can make it difficult to seal and may cause the samosa to burst during cooking.
About 1-2 tablespoons of filling per samosa is usually sufficient, depending on the size of your cone.
Once filled, it’s time to seal the samosa. Moisten the edges of the open top of the cone with water or your flour-water paste. Bring the two sides together, pressing firmly to seal.
You can then pleat one side of the seam and press it against the other side to create the classic triangular shape. Alternatively, you can simply press the sides together and ensure a tight seal all around. The key is a good, secure seal so the filling doesn’t escape during cooking.
Ensure there are no gaps or holes.
To make them stand upright neatly, you can gently flatten the base of the sealed samosa. This also helps them sit nicely during frying or baking. Place the assembled samosas on a tray lined with parchment paper, ensuring they don’t touch each other to prevent sticking.
You can assemble all your samosas before you begin the cooking process.
The Flour and Water Paste Sealant
A common and effective way to seal samosas is by using a simple paste made from flour and water. This paste acts as a natural adhesive, creating a strong bond between the pastry edges. It’s easy to make: just mix a tablespoon or two of all-purpose flour with just enough water to form a thick, smooth paste.
The consistency should be like thick glue, not too runny and not too stiff.
When assembling, apply a thin layer of this paste along the edges of the pastry where you want to create a seal. For the cone shape, apply it along the straight edges that will be joined. For sealing the top, apply it along the exposed edges after filling.
Press the pastry edges together firmly. The paste helps to create a watertight seal that prevents the filling from leaking out during the cooking process, especially when frying. If the pastry edges are too dry, they won’t stick well.
If the paste is too watery, it might not hold as firmly.
This flour-water paste is preferable to just water because the flour adds a bit more substance and strength to the seal. It also helps the pastry stick to itself more effectively. Once sealed, excess paste should not be visible on the outside.
A good seal is crucial for the integrity of the samosa during cooking. You want all the delicious filling to remain inside where it belongs.
Cooking Chicken Samosas
Now for the final, exciting step: cooking your chicken samosas to golden perfection! You have two main options: frying or baking. Both methods can yield delicious results, but they offer different textures and require slightly different techniques.
We’ll explore both.
Deep Frying Samosas
Deep frying is the traditional method for making samosas, resulting in a supremely crispy and golden exterior. It’s also the quickest way to cook them.
-
Heat Oil: Pour enough vegetable oil or ghee into a deep, heavy-bottomed pot or deep fryer to submerge the samosas. Heat the oil over medium-high heat to about 350-375°F (175-190°C). You can test if the oil is ready by dropping a small piece of pastry into it; it should sizzle and float to the top immediately.
-
Fry in Batches: Carefully place 3-4 samosas into the hot oil, making sure not to overcrowd the pot. Overcrowding will lower the oil temperature, leading to greasy, less crispy samosas.
-
Cook Until Golden: Fry the samosas for about 5-8 minutes, turning them occasionally with a slotted spoon, until they are evenly golden brown and crispy. The pastry should be puffed up and firm.
-
Drain Excess Oil: Using the slotted spoon, remove the cooked samosas from the oil and place them on a wire rack set over a baking sheet or on paper towels to drain any excess oil. This step is vital for maintaining crispiness.
The aroma of freshly fried samosas is truly intoxicating. The sound of the sizzle as they hit the oil is music to a home cook’s ears. It’s a process that requires a little attention, but the reward of biting into a perfectly crisp, hot samosa is immense.
Remember to maintain the oil temperature throughout the frying process; a thermometer is your best friend here.
Baking Samosas for a Healthier Option
Baking is a healthier alternative to frying, and with the right technique, you can still achieve a satisfyingly crispy result. It’s also a more hands-off approach.
-
Preheat Oven: Preheat your oven to 400°F (200°C). Line a baking sheet with parchment paper or a silicone baking mat.
-
Brush with Oil: Arrange the assembled samosas on the prepared baking sheet, ensuring they have some space between them. Brush the tops and sides generously with melted butter, ghee, or oil. This is crucial for achieving a golden and crispy exterior.
-
Bake Until Golden: Bake for 20-30 minutes, or until the samosas are golden brown and appear crispy. You may want to flip them halfway through for even browning, though this is not always necessary if the oven temperature is consistent.
-
Cool Slightly: Let the baked samosas cool on the baking sheet for a few minutes before serving. They will continue to crisp up as they cool.
Baked samosas offer a lighter experience. While they might not achieve the exact same shatteringly crisp texture as fried ones, they are still delicious and a great option if you’re watching your fat intake or prefer a less messy cooking method. The key is the generous application of oil or ghee before baking to mimic the effect of frying.
Serving and Storing Chicken Samosas
Once your chicken samosas are cooked to perfection, the next step is to enjoy them! Serving them fresh and hot is always best. They are a versatile snack that can be enjoyed at any time of day.
Traditionally, samosas are served with a variety of chutneys or dips. Popular choices include mint chutney, tamarind chutney, or a spicy coriander chutney. A simple cooling yogurt dip can also be a refreshing accompaniment, especially if your samosas are on the spicier side.
They make a fantastic appetizer for parties or a satisfying snack with tea.
For larger gatherings, a platter of assorted samosas (perhaps with a vegetable version too!) is always a crowd-pleaser. The warm, savory filling encased in a crispy shell is irresistible. They pair wonderfully with a cup of chai or a refreshing beverage.
If you have any leftover samosas, they can be stored and reheated. Allow them to cool completely before storing. Place them in an airtight container.
For best results, store them in the refrigerator for up to 2-3 days. They can also be frozen for longer storage, up to 2-3 months. To reheat, place them in a preheated oven at around 350°F (175°C) until heated through and crispy again.
Reheating in an air fryer is also an excellent option for restoring crispiness.
Best Accompaniments for Samosas
The right accompaniments can elevate the samosa experience. Think of them as partners that complement and enhance the samosa’s flavor profile.
-
Mint Chutney: This vibrant green chutney, made from fresh mint leaves, cilantro, green chilies, ginger, garlic, and lemon juice, offers a cool, herbaceous, and slightly tangy counterpoint to the warm spices of the samosa. It’s incredibly refreshing.
-
Tamarind Chutney: Also known as imli chutney, this is a sweet and sour sauce made from tamarind pulp, jaggery or sugar, and spices. Its tangy sweetness cuts through the richness of the fried pastry and the savory filling, creating a delightful contrast.
-
Coriander Chutney: Similar to mint chutney, but with a stronger, more peppery flavor from the coriander leaves. It can be spiced up with chilies and balanced with lemon. It offers a fresh, zesty flavor.
-
Yogurt Dip: A simple dip made from plain yogurt, perhaps with a pinch of salt and a sprinkle of cumin or mint, provides a cooling contrast to the spices and a creamy texture. It’s a gentle accompaniment.
-
Ketchup or Chili Sauce: For a more contemporary or kid-friendly option, plain ketchup or a sweet chili sauce can also be served, though traditional chutneys are generally preferred for their authentic flavors.
Choosing the right dip depends on your preference for sweet, sour, spicy, or cooling. Often, offering a variety allows everyone to customize their samosa experience.
Common Myths Debunked
Myth 1: Samosas are always deep-fried
This is a common misconception. While deep frying is traditional and yields a distinctly crispy texture, samosas can also be baked in an oven. Baking offers a healthier alternative and still produces a delicious, golden-brown, and satisfyingly crisp samosa, especially when brushed with oil or ghee.
The key to good baked samosas is a hot oven and adequate fat application to mimic the crisping effect of frying.
Myth 2: Making samosa pastry is very difficult
Many people believe homemade samosa pastry is complicated. In reality, a basic dough uses only flour, salt, fat, and water. The process involves mixing, kneading briefly, and resting.
It’s much simpler than it appears, and the result is a superior texture compared to some store-bought options. Even using store-bought wrappers is straightforward, requiring just careful handling to prevent drying.
Myth 3: You must use specific exotic spices
While traditional spices like cumin, coriander, and garam masala are essential for authentic flavor, the exact blend can be adjusted. Many common pantry spices can be used, and the heat level can be modified by adjusting the amount of chili powder. You don’t need rare or hard-to-find ingredients to make delicious chicken samosas.
The core spices are generally available in most supermarkets.
Myth 4: Samosas are only a snack
While often enjoyed as a snack or appetizer, samosas can also be a substantial part of a meal. A few samosas, especially when served with a side of lentil dal, a yogurt raita, and a simple salad, can make for a complete and satisfying lunch or light dinner. Their filling makes them quite filling on their own.
Frequently Asked Questions
Question: How do I prevent my samosa pastry from becoming soggy?
Answer: To prevent soggy samosas, ensure your filling is completely cooled and not too wet. When frying, maintain a consistent oil temperature. For baking, don’t overcrowd the baking sheet and ensure you brush the samosas generously with oil or ghee.
Proper draining after frying or cooking until golden brown in the oven is also key.
Question: Can I make the chicken filling ahead of time?
Answer: Yes, you can make the chicken filling a day in advance. Once it has cooled completely, store it in an airtight container in the refrigerator. This saves time when you are ready to assemble the samosas.
Ensure it is thoroughly reheated or brought back to room temperature before filling.
Question: What is the best way to fold a samosa?
Answer: The most common method is to form a cone with the pastry, fill it, then moisten the edges and seal by bringing the sides together, often with a pleat for a classic look. Practice makes perfect, and even an imperfectly folded samosa will taste delicious.
Question: Can I use different types of chicken for the filling?
Answer: Absolutely! While ground chicken is common, you can also use finely chopped chicken breast or thigh. Some recipes even use shredded cooked chicken.
Ensure the chicken is cooked thoroughly and chopped or minced to a size that cooks quickly within the pastry.
Question: How long do homemade chicken samosas last?
Answer: Freshly made chicken samosas are best enjoyed immediately. If you have leftovers, they can be stored in an airtight container in the refrigerator for 2-3 days. For longer storage, freeze them and reheat in the oven or air fryer until crispy.
Summary
Making delicious chicken samosas is an achievable goal for any home cook. We explored selecting the best ingredients, preparing a flavorful chicken filling, mastering pastry techniques, and the best ways to cook them. Whether you fry or bake, a well-made chicken samosa offers a delightful blend of spices and textures.
Enjoy creating these wonderful treats!
Related Posts
Easy Homemade Chicken Nuggets Cooking Recipe

Easy Crispy French Fries Cooking Recipe