Easy Egg Khichuri Cooking Recipe Guide
Many people want to make egg khichuri, but sometimes it seems tricky. You might worry about the rice and lentils cooking just right or getting the flavors perfect. But making a delicious egg khichuri is easier than you think!
This guide will show you exactly how to do it, step by step, so you can make a yummy meal without any fuss. Get ready to learn the simple way to create this popular dish.
Key Takeaways
- You will learn the basic ingredients needed for egg khichuri.
- Understand the simple steps for cooking rice and lentils together perfectly.
- Discover how to add eggs for a protein-rich and tasty meal.
- Find tips to make your egg khichuri flavorful and enjoyable.
- Learn how to serve your egg khichuri for the best taste.
Mastering the Egg Khichuri Cooking Recipe
This section guides you through making a fantastic egg khichuri. We will cover what you need and how to put it all together. It’s a very comforting and filling dish, perfect for any meal.
By following these steps, you can create a wonderful meal that everyone will love. Let’s get started on this easy and rewarding cooking adventure.
Essential Ingredients for Egg Khichuri
To make a great egg khichuri, you need a few simple things. Rice and lentils are the base of this dish. You’ll also need some eggs, of course, and a few spices to make it taste amazing.
Fresh ingredients make a big difference, so try to use good quality items if you can. Having everything ready before you start cooking makes the whole process smoother.
Rice and Lentils
The heart of khichuri is the rice and lentils. A common choice is using a mix of rice and a lentil called moong dal, which is a split yellow lentil. Moong dal cooks quickly and gives khichuri a creamy texture.
You can also use other lentils like masoor dal (red lentils), but moong dal is traditional. The ratio of rice to lentils can be adjusted based on your preference. Some like it rice-heavy, while others prefer more lentils.
A good starting point is a 1:1 ratio of rice to lentils, or you can use a bit more rice, like 1.5 cups of rice to 1 cup of lentils. Using short-grain rice, like Arborio or even regular white rice, works well. It becomes soft and mushy, which is the desired texture for khichuri.
Make sure to wash both the rice and lentils thoroughly before cooking. This removes any dust or debris and helps them cook more evenly.
Eggs
The ‘egg’ in egg khichuri usually means adding whole eggs or scrambled eggs towards the end of cooking. Some recipes involve whisking eggs and pouring them into the simmering khichuri to cook like a sort of poached egg. Others might cook the khichuri and then top it with a fried or boiled egg.
For this simple recipe, we will be gently cooking whisked eggs right into the khichuri for a creamy, integrated dish.
Using two to three eggs is usually enough for a standard batch of khichuri. The eggs add protein and a richness that complements the rice and lentils. They also help to bind the khichuri slightly, making it even more satisfying.
If you are not a fan of eggs mixed in, you can always serve a fried egg on top as an alternative.
Spices and Aromatics
Flavor is key to any good khichuri. You will need basic spices like turmeric powder for color and earthy flavor, cumin seeds, and coriander powder. Ginger and garlic are essential aromatics that add depth.
A pinch of asafoetida (hing) is often used in Indian cooking and adds a unique savory note. You can also add green chilies for a bit of heat. Some people like to add whole spices like bay leaves or cardamom pods for extra fragrance.
Salt is, of course, a must. You can add it while cooking or adjust it at the end. A little bit of ghee or oil is needed to sauté the spices and aromatics.
Ghee, a clarified butter, adds a wonderful nutty flavor and richness that is traditional for khichuri. If you don’t have ghee, vegetable oil or mustard oil can also be used. The combination of these simple ingredients creates a flavorful foundation for your egg khichuri.
Step-by-Step Egg Khichuri Cooking Instructions
Now that you have your ingredients, let’s walk through the cooking process. This is where the magic happens. We will focus on cooking the rice and lentils perfectly before adding the eggs.
Each step is designed to be easy to follow, even for someone new to cooking. You will see how simple it is to bring all these flavors together.
Preparing the Rice and Lentils
Start by rinsing your rice and moong dal under cold running water. Do this until the water runs clear. This removes excess starch, preventing the khichuri from becoming too gummy.
You can do this in a fine-mesh sieve or directly in the pot you will be cooking in.
Once rinsed, you can soak them for about 15-30 minutes if you have the time. Soaking helps them cook faster and more evenly. However, if you are short on time, you can skip this step and proceed directly to cooking.
Sautéing Aromatics and Spices
In a heavy-bottomed pot or pressure cooker, heat a tablespoon of ghee or oil over medium heat. Once the ghee is hot, add about a teaspoon of cumin seeds. Let them splutter for a few seconds.
Then, add a pinch of asafoetida (hing) if you are using it. Be careful, as hing can burn quickly.
Next, add about a teaspoon of finely chopped ginger and a teaspoon of finely chopped garlic. Sauté them for about 30 seconds until their raw smell disappears. Be careful not to burn them.
You can also add one or two chopped green chilies at this stage if you like it spicy. Then, add your powdered spices: about half a teaspoon of turmeric powder and a teaspoon of coriander powder. Stir them in for about 15-20 seconds until fragrant.
Cooking the Rice and Lentils
Add the rinsed rice and lentils to the pot with the sautéed spices. Stir everything together for about a minute. This helps the grains of rice and lentils get coated in the spice mixture and toast slightly, which adds to the flavor.
Now, add water. For a pot, a good ratio is about 3 cups of water for every 1 cup of rice and lentils mixture. If you are using a pressure cooker, you might need slightly less water, around 2 to 2.5 cups.
Add salt to taste at this point. Bring the mixture to a boil.
Simmering to Perfection
Once boiling, reduce the heat to low, cover the pot tightly, and let it simmer. If using a pot, it will take about 20-25 minutes for the rice and lentils to cook through and become tender. Stir occasionally to prevent sticking.
If using a pressure cooker, close the lid and cook for about 3-4 whistles on medium heat. Let the pressure release naturally before opening the lid. This method is faster and ensures the khichuri is perfectly cooked and creamy.
Adding the Eggs
Once the rice and lentils are cooked and the mixture is soft and porridge-like, it’s time to add the eggs. Make sure the khichuri is simmering gently. In a separate bowl, whisk 2-3 eggs with a pinch of salt.
You can add a tiny pinch of turmeric to the eggs if you wish, but it’s optional.
Slowly pour the whisked eggs into the simmering khichuri while stirring continuously with a spoon or whisk. Keep stirring gently for about 2-3 minutes until the egg is cooked and integrated into the khichuri, giving it a richer, creamier texture. Do not overcook at this stage, as the eggs can become rubbery.
Final Touches and Serving
Taste your egg khichuri and adjust the salt if needed. For an extra burst of flavor and aroma, you can temper a little ghee with some cumin seeds and curry leaves and pour it over the finished khichuri. This is an optional step but highly recommended for authentic taste.
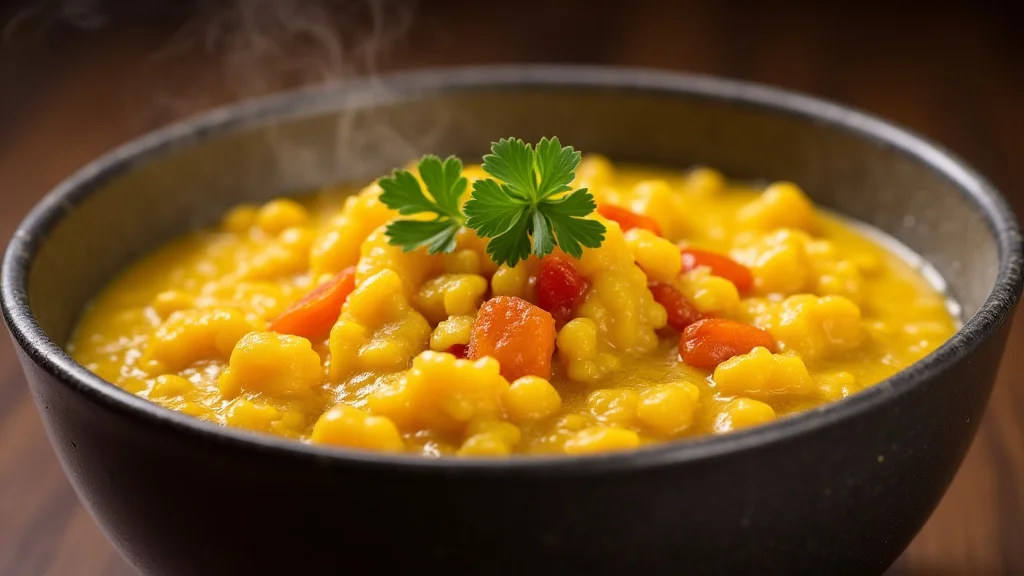
Serve the egg khichuri hot. It is often enjoyed on its own, but it pairs wonderfully with a side of plain yogurt, a dollop of pickle, or some simple stir-fried vegetables. A sprinkle of fresh cilantro on top adds a nice freshness.
Tips for the Best Egg Khichuri
Making egg khichuri is straightforward, but a few tips can elevate your dish from good to great. These small adjustments can make a big difference in taste and texture. Think of these as little secrets to unlock even more deliciousness in your cooking.
They are easy to incorporate and will help you achieve that perfect comfort food feel every time.
Achieving the Right Consistency
The consistency of khichuri is a matter of personal preference, but it should generally be soft and slightly porridge-like. If your khichuri is too thick after cooking, you can add a little hot water while it’s still on the stove and simmer for a few more minutes until you reach your desired thickness. This is especially helpful after adding the eggs, as they can also absorb some liquid.
Conversely, if it’s too watery, you can cook it uncovered on low heat for a few extra minutes to allow some of the excess water to evaporate. Don’t be afraid to adjust the liquid content to suit your liking. The goal is a comforting, spoonable dish.
Enhancing the Flavors
Beyond the basic spices, you can enhance the flavor of your egg khichuri. Adding a bay leaf or a small piece of cinnamon stick while sautéing the whole spices can impart a lovely aroma. A pinch of garam masala added at the very end, just before serving, can give it a warm, spicy finish.
Some people also like to add a squeeze of lemon juice or a bit of tamarind pulp towards the end for a touch of tanginess.
The tempering at the end is also a significant flavor booster. Heating ghee with cumin seeds, mustard seeds, dried red chilies, and curry leaves until the spices crackle and release their aroma is a traditional way to add a final layer of deliciousness. This fragrant oil is then drizzled over the finished khichuri.
Variations to Try
While this is a basic egg khichuri recipe, there are many ways to vary it. You can add mixed vegetables like peas, carrots, potatoes, or cauliflower along with the rice and lentils. Cooked spinach or other greens can also be stirred in for added nutrition and color.
For a richer dish, you can use a bit more ghee or even add a splash of milk towards the end of cooking, along with the eggs.
Another popular variation is to make a “masala” khichuri. This involves sautéing onions, tomatoes, and more complex spice blends before adding the rice and lentils. You can also serve the egg khichuri with different toppings.
Instead of just a fried egg, consider a soft-boiled egg or even scrambled eggs mixed in a more pronounced way. Experimenting with different types of lentils, like red lentils or a mix, can also change the texture and flavor profile.
Common Myths Debunked
There are a few ideas about making khichuri that might make it seem harder than it is. Let’s clear up some common myths so you can feel confident cooking this dish.
Myth 1: Khichuri is Bland and Boring
Reality: While basic khichuri is meant to be comforting and easy to digest, it is far from bland. The use of aromatics like ginger and garlic, along with spices like turmeric, cumin, and coriander, provides a wonderfully warm and earthy flavor. Adding eggs, as in egg khichuri, introduces richness.
Furthermore, finishing touches like a ghee tempering or fresh herbs can significantly boost the taste. It’s a versatile dish that can be spiced up to suit any palate.
Myth 2: You Need Special Grains or Lentils
Reality: The beauty of khichuri is its simplicity and reliance on common pantry staples. While moong dal is traditional and gives a lovely creamy texture, other lentils like red lentils (masoor dal) or even split chickpeas (chana dal) can be used. For rice, any medium or short-grain white rice will work perfectly.
You don’t need exotic ingredients to make a delicious egg khichuri.
Myth 3: It’s Difficult to Get the Texture Right
Reality: Achieving the right texture for khichuri is actually quite forgiving. The goal is a soft, porridge-like consistency. The ratio of water to grains is the main factor.
Most recipes suggest a 3:1 or 4:1 ratio of water to rice/lentil mix, but this can be adjusted. If it’s too thick, add more hot water. If it’s too thin, simmer it uncovered for a bit longer.
The addition of eggs also naturally helps to create a softer, creamier texture.
Myth 4: Khichuri Takes a Very Long Time to Cook
Reality: While slow simmering in a pot takes time, using a pressure cooker significantly reduces the cooking duration. Most pressure cooker khichuri recipes are ready within 20-30 minutes from start to finish, including sautéing and cooking time. Even in a pot, the active cooking time is minimal; it’s mostly hands-off simmering.
This makes it a relatively quick meal, especially for busy weeknights.
Frequently Asked Questions
Question: What is the best type of rice for egg khichuri?
Answer: Medium or short-grain white rice works best for egg khichuri. These types of rice break down more easily, creating the soft, porridge-like texture that is characteristic of khichuri.
Question: Can I make egg khichuri without moong dal?
Answer: Yes, you can. Red lentils (masoor dal) are a good substitute for moong dal. They also cook quickly and give a creamy texture.
You can also use a mix of different lentils.
Question: How many eggs should I add to my egg khichuri?
Answer: For a standard pot of khichuri, 2 to 3 eggs are usually sufficient. This adds a good amount of protein and richness without making the dish too eggy.
Question: Is egg khichuri healthy?
Answer: Egg khichuri is generally considered a healthy meal. It combines carbohydrates from rice with protein from lentils and eggs, and can be made even healthier by adding vegetables.
Question: Can I make egg khichuri vegan?
Answer: To make it vegan, you would omit the eggs and the ghee. Use oil instead of ghee and potentially add tofu or more vegetables for protein and substance.
Summary
This guide has shown you how to make a delicious and comforting egg khichuri cooking recipe. You learned about the simple ingredients, the step-by-step cooking process, and tips for success. Now you can easily prepare this flavorful dish for yourself and your loved ones.
Related Posts

Easy Homemade Chicken Nuggets Cooking Recipe

Easy Crispy French Fries Cooking Recipe